MPI-based daemon programmes have been employed to control temperature by varying ON/OFF time of a heater through CTC port of a microprocessor. The temperature controller daemon programme has location-wise memory - each location remembers previous integral value for heater power corresponding to it. This allows the system to gauge the correct heater power to output when the temperature controller is used for different locations with different thermal surroundings. This feature is particularly useful for the case where a sample has to be moved in an ac susceptometer.
Keywords |
| Temperature controller, Message Passing Interface, Daemon programmes, Pulse width modulation, location-wise
memory. |
INTRODUCTION |
| In order to accurately control and measure the sample temperature, a temperature controller is essential. There are many
approaches control temperature like ON/OFF, Proportional (P), Proportional Derivative (PD) and Proportional Integral
Derivative (PID). These control mechanisms are based on Conventional Control Logic (CCL). There is another control
logic - Fuzzy Logic Control (FLC) [1] which has become very popular recently. Here we have used MPI-baseddaemons-
controlled programmes by CCL PID control mechanism for temperature control using a microprocessor. |
DAEMONS |
| In programming parlance a daemon is a stand-alone programme running in „userspace‟ (as opposed to kernel modules
which run in kernel space) which handles a particular type of activity, often related to control of hardware. The CUPS
(Common Unix Printing System) or lpd (line printer daemon) daemons are such examples in linux operating system
which control the printers. This is necessary because if the printer hardware is directly accessible from the user
programmes, multiple programmes trying to simultaneously access the printer will cause the lines to get jumbled up. So
some form of arbitration is necessary. The CUPS or lpd daemons handle spooling, print job scheduling and checking
for printer availability (if the printer is off, offline or out of paper, the daemon places the print job in a queue and tries
to print it periodically. |
| User programmes generally „request‟ the daemons to perform specific tasks. For example, the lpr command in UNIX
does not try to access the printer hardware but instead requests the CUPS or lpd daemon to do the work. This means
that programs need to communicate among themselves, a feature generally referred to as IPC or Inter Process
Communication. If the two programmes run on the same computer, this communication is handled by the kernel by
basically copying data between memory locations, but in the case of programmes running on different computers,
networking has to be invoked. |
| In our setup, a number of sub-systems need to work together to make measurements possible. As an example, our 16-
channel meter uses hardware controlled by the Z80A microprocessor. On the other hand, the temperature controller
needs to access the Z80 Counter-Timer (CTC) to change heater power through pulse-width modulation. The CTC is controlled by the same microprocessor (they are on the same training kit board). Now if a request for a change of CTC
setting comes through while the meter is measuring something, a conflict should occur, scuttling both processes. Our
solution is to have a daemon to control communication with the microprocessor. The meter programme and
temperature controller programme both send their requests to this daemon. The daemon puts the second request on
hold, services the first, and handles the second one in its turn. Again, different free-running programmes may need to
access different channels of the 16-channel voltmeter. This necessitates the intervention of another daemon to handle
these conflicting requests. Thus two daemon programmes cascade together to allow different subsystems to work in a
free-running manner. In principle it would be possible to incorporate all the steps in the measurement within the ambit
of one master programme, thus eliminating the free-running nature of the different parts and hence automatically
synchronising them. Then we would not need these daemons. However, the complexity of such a master programme
would be huge almost to the point of being unmanageable. Multiple users would also not be able to use the system
simultaneously. |
EXPERIMENTAL DETAILS |
| The whole setup is divided in two parts; hardware and software. Each part is discussed as follows: |
| A. Hardware |
| The microprocessor based system used here comprises a Microprocessor trainer kit with the 4MHz Zilog Z80A
processor [2], built-in Counter/Timer CTC, a control circuit for the heater current, computer controlled MPI-based
voltmeter [3], a small heater coil made of constantan and a preamplifier circuit for sensing voltage from PT100 RTD
(Resistance Temperature Detector) output. |
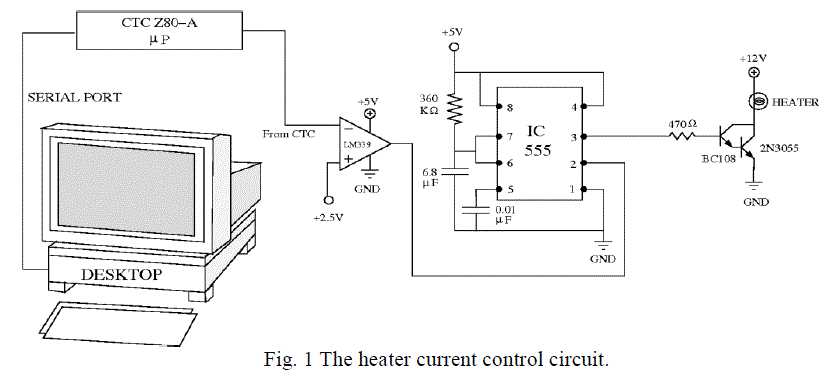
| Control circuit for heater: The pulse width modulated (PWM) heater current control circuit is shown in figure 1.
Basically this circuit is controlled by the Counter/Timer circuit (CTC) of the Z-80 based microprocessor kit followed
by a monostable multivibrator and a darlington pair. The CTC has four independent counter/timer circuits, each
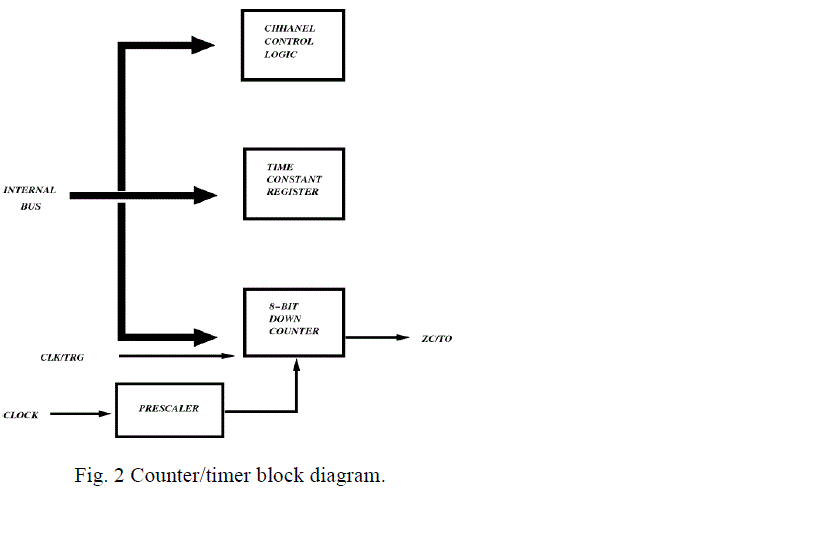
containing the logic as shown in figure 2. |
| The channel control logic receives 8-bit channel control word when the counter/timer channel is programmed. The
channel control logic decodes the channel control word and sets the following operating conditions: |
| Interrupt enable (or disable). |
| Operating mode (Timer/counter). |
| Timer mode prescaler factor (16/256). |
| Active slope for CLK/TRG input. |
| Timer mode trigger (automatic or CLK/TRG input). |
| Time constant data word to follow. |
| Software reset. |
| Each channel of the CTC is individually programmed with two words; a control word and a time-constant word. The
control word selects the operating mode (counter or timer) and other operation parameters. If the timer mode is
selected, the control word sets a prescaler, which divides the system clock by either 16 or 256. The time-constant word
is a value from 1 to 256. The timer mode determines time intervals as small as 4μs (frequency 4MHz ) without
additional logic or software timing loops. Time intervals are generated by dividing the system clock with a prescaler
(16 or 256) that decrements a preset down counter. A timer is triggered automatically when its time constant value is
programmed, or by an external CLK/TRG input. In our case we have cascaded two channels of the timer/counter to
make it a „large timer‟. First the timer mode is selected through control word which is followed by a time constant
which is determined by the heater power controlling software. After predefined time period the output of the timer
resets to zero which triggers the counter that is also operated through a control word followed by a value. This value is
also calculated by the software to control the exact heater current. The control word for selecting timer mode and the
counter mode is shown below: |
 |
| The output of the cascaded timer/counter is taken as the trigger of an IC 555 timer-based monostable multivibrator.
Since the on-time of the monostable multivibrator in fixed, by varying the time constant of the timer and hence the
triggering interval, the duty cycle (on-time/total time period) of the heater can be controlled. Depending on the
requirement of heater power, which is calculated with the help a software by sensing the temperature by a PT100 RTD,
heater current is adjusted through a darlington pair ( BC108 & 2N3055) which is driven by the output of the
monostable multivibrator. The heater is connected to the collector of the power transistor 2N3055. We have chosen
constantan wire as the heating element of resistance ~ 14Ω. The wire is first insulated with Teflon tape and it is wound
non-inductively like a bobbin to make it shaped like a spiral disk. The size of our heater is almost the same as that of
the sample and it is mounted on one face of the sample. On the other face a Pt-100 (Platinum Resistance Thermometer)
thin film type temperature sensor is attached. The voltage source of the heater as shown in figure 1 is +12V dc, but the
dc source voltage can be be selected to different voltages upto +30V , if necessary. |
Temperature sensor circuit: |
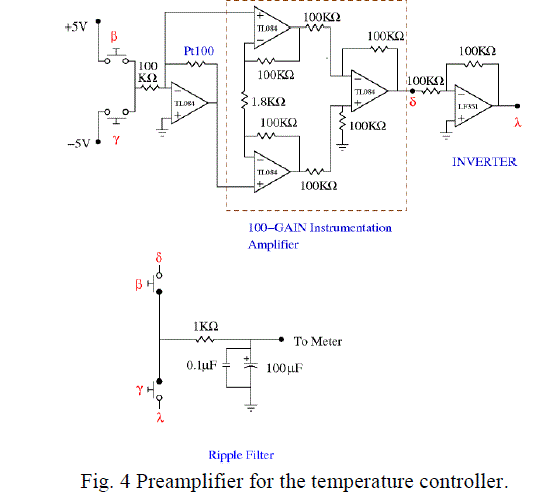
| The circuit diagram for the temperature sensor is shown in figure 2 and 3. The main element of this circuit is a PT100
(PRT) which offers an excellent accuracy over a wide temperature range (from -200 to +850o C). Standard Sensors are
available from many manufacturers with various accuracy specifications and numerous packaging options to suit most
applications. The principle of operation is to measure the resistance of a platinum element. The PT100 has a resistance
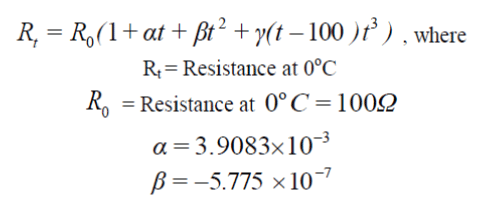
of 100Ω at 0oC and 138.4Ω at 100oC. The relationship between temperature and resistance is approximately linear over
a small temperature range. The relation between the resistance and the temperature is given below: |
 |
 |
| For a PT100 sensor, a 1oC temperature change will cause a 0.384Ω change in resistance, so even a small error in
measurement of the resistance (for example, due to the resistance of the wires leading to the sensor) can cause a large
error in the measurement of the temperature. For high precision we have followed the four-probe method where four
wires are used - two to carry the sense current, and two to measure the voltage across the sensor. The current through
the sensor will cause some heating. If the sensor element is unable to dissipate this heat, it will reflect as a higher
temperature. To eliminate this effect we have used very small ac constant current ≈ 49μA through the sensor. A
chopper amplifier is used to amplify the output signal of the PT100 to such a value that the voltmeter used here can
read the voltage at better accuracy. Because of the low signal levels, the cables are kept away from electric cables,
motors and other devices that may emit electrical noise. |
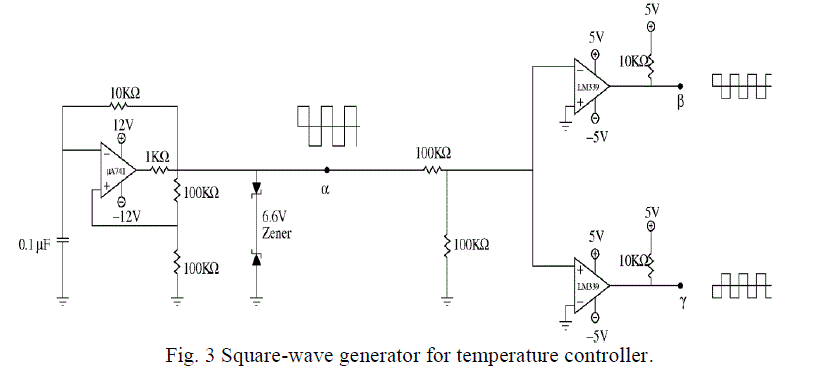
| Figure 3 shows the square-wave generator part of the temperature controller circuit. Here an op-amp based astable
multivibrator is used to generate square-wave. In order to get output pulses of equal on-off time, the saturation voltage
is clipped to ±6.6V by two zeners ( α ). After reducing the peak voltages of the square wave it is fed to two LM339
comparators, which produce two out-of-phase square waves. The peak of the square waves are at ±5V (β) and
5V (γ) with errors of ∼0.2V due to the saturation drop of the open-collectors stages. These square waves are
used to control two CMOS (CD4066) switches, the outputs of which are shorted into one and inputs are connected to
+5V and -5V respectively (figure 4). Thus the amplitudes of the output waveform are accurately tied to ±5V , which is
maintained by accurate voltage regulator ICs. The constant current is maintained by the input resistance (100KΩ ) of
the inverting amplifier configured as a voltage-to-current converter. The voltage across of the PT100 which is
connected as the feedback resistance of the inverting amplifier, is fed through an instrumentation amplifier of 100 gain.
Another pair of CMOS switches, driven by the same input signals β and γ , are now used to rectify the signal (like a
LIA) and the final outputs filtered by a RC stage before being fed to the input of the 16-channel voltmeter. |
B. Software: |
| We have introduced here MPI-based daemon programmes written in C++ and tcl/tk languages to control the heater
current with the hardware. The communication model used in this work has been discussed below: |
| We have tried to keep scope for improvements and expansion open. Thus, from the very beginning, we have tried to
allow different subsystems to run on different computers if necessary. In order to do so, we have used the free LAM
(Local Area Multicomputer) software, which implements the MPI (Message Passing Interface) standard, allowing
parallel programmes to run on clusters. |
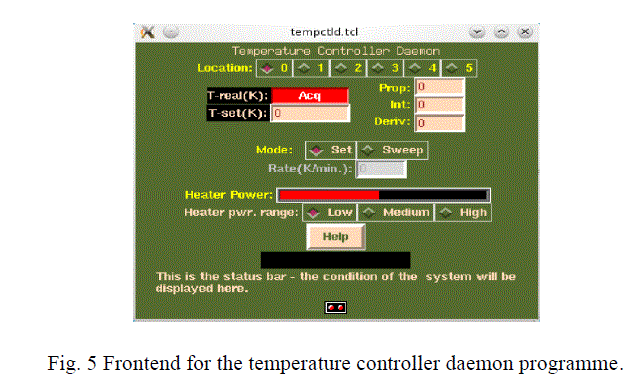
| The main daemon program is “tempctld” (Temperature controller daemon) which controls the whole process. There is
another helper program which sends requests (wake-up call) to the daemon program periodically. The daemon program
senses temperature, calculates heater power and sends requests to the microprocessor CTC to feed desired pulses for
maintaining heater temperature. The graphics frontend of “tempctld” is shown in figure 5. The working principle is as
given below: |
| • It initially sets “heater power”, “set temperature”, “proportional term (P)”, “integral term (I)” and
“derivative term (D)” to ‟ZERO‟. |
| • Sends request to meter daemon (using channel 14) to measure the output of the temperature controller
circuit. |
| • Calculates the resistance value of PT100 and displays the “Actual temperature”. |
| • The daemon has different input variables i.e. Set Temperature; P, I, D; Modes - Set / Sweep; Heater range-
Low / Medium / High; Locations (6 locations). Any new entry can be made by directly inserting the values
into the GUI or using a command-line program named “tempctld_set”. A library of subroutines enables
other programmes to send requests to “tempctld”. |
| • After getting new values, the daemon program first calculates the required heater power using PID
algorithm. |
| • The daemon has three heater power ranges each of which has predefined integer values. |
| • Depending upon the range of the heater power, the program calculates the second integer value using heater
power formula. |
| • The daemon program sends request to microprocessor and dumps the calculated integers to the CTC. |
| • The daemon program sends request to microprocessor and dumps the calculated integers to the CTC. |
| integers to the CTC. |
| • The daemon now enters a blocking receive mode and waits till it is woken up either by the helper (to update
the controller parameters periodically) or by some other program requesting specific actions, like changing
PID or setting a new temperature, etc. |
| • The temperature controller can be used in two modes; set mode and sweep mode. In set mode the daemon
program sets the “set temperature” and waits for any call and in the sweep mode the program starts from the
initial temperature and continually changes the target temperature with a temperature rate defined by the
user or any other program. |
| • The temperature controller daemon has six locations. The previous integral value is stored in a 6-member
array. This function is very useful for controlling temperature at different positions by using a suitable
starting heater power if needed. |
RESULTS AND DISCUSSION |
| The temperature controller is calibrated with DMM Mastech Model: MAS838H with temperature sensing probe. The
calibration is done for C o 0 , C o 100 , and room temperature. The temperature controller can resolve temperature
difference better than 0.2K.The location-wise setting of the daemon is very useful for such system for which sample
with the temperature controller has to be moved measurements. |
Figures at a glance |
 |
 |
 |
 |
 |
| Figure 1 |
Figure 2 |
Figure 3 |
Figure 4 |
Figure 5 |
|
References |
- M. D. Hanamane, R. R. Mudholkar, B. T. Jadhav, S. R. Sawant, âÃâ¬ÃÅImplementation of fuzzy temperature control using microprocessorâÃâ¬ÃÂ, Journalof Scientific & Industrial Research, vol. 65, pp. 142-147, 2006.
- Zilog Z-80 Data Book, California: Zilog, 1978. Retrieved 2009-07-20.
- S. Roy, S. Sil, A. Chakravarti, âÃâ¬ÃÅA voltmeter with browser-based control: an inexpensive instrumentâÃâ¬ÃÂ, Indian Journal of Physics, vol. 84, no. 3,pp. 301-307, 2010.
|