ISSN ONLINE(2278-8875) PRINT (2320-3765)
ISSN ONLINE(2278-8875) PRINT (2320-3765)
Mohammad Abdullah Al Shohel1, Mashad Uddin Saleh2, Biswajit Biswas Dipan3, Gazi Mahamud Hasan4, Md. Abul Hasnat Ferdous5
|
| Related article at Pubmed, Scholar Google |
Visit for more related articles at International Journal of Advanced Research in Electrical, Electronics and Instrumentation Engineering
In modern electronics laboratory a voltmeter with high precision and digital displaying mechanism is an essential device. This paper describes the mechanism of a voltmeter that can measure voltage up to 30.00 V with a resolution of 10mV. In this voltmeter the achieved accuracy is quite good so that it can be used where precise voltage measurement is required.
Keywords |
| Voltmeter, precision, staircase, ADC, DAC. |
INTRODUCTION |
| A voltmeter is an instrument used for measuring electrical potential difference between two points of an electrical circuit. Voltage is a fundamental quantity that is important in every phase of electrical engineering from power systems to voltages inside VLSI chip [1]. Various physical quantity that can be converted to voltage using sensors, e.g. pressure, temperature, etc. can be displayed on a voltmeter. Therefore measurement of voltage is an area of concern in a wide range of discipline. Operating range may vary depending on the area under consideration. In power line voltage is in kV range, whereas voltage produced by nerve cells is in mV range. In this work, the voltmeter is designed to be operated within 0~30V range with 10mV precision. |
WORKING PRINCIPLE |
| Some basic methods for estimating the value of an unknown voltage are |
| Successive Approximation Method, |
| Staircase Method, |
| Single-slope method, |
| Dual-slope method. |
| In digital Ramp or Staircase method, the voltage to be measured (sample voltage), Vin is continuously compared to a internally generated voltage, Vgen that builds up gradually. Initially the internal voltage is set to zero and then it builds up successively in equal steps. When the internal voltage exceeds the sample voltage the conversion process is over. Number of step sizes required for the whole conversion is a digital code that represents the sample voltage [2]. |
 |
| Fig.1 Illustration of staircase methods |
| As the operating range of the designed voltmeter is 0~30V, two voltage level detectors are used to check whether the voltage to be measured lies within the operating range. |
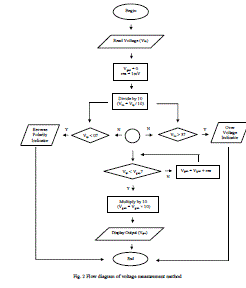 |
| Fig. 2 Flow diagram of voltage measurement method |
| Display in a digital voltmeter may use either LCD or LED. For simple application, 7 segment LED display are used. |
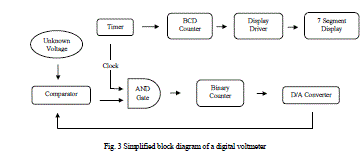 |
| Fig. 3 Simplified block diagram of a digital voltmeter |
| The overall process can be classified into three segments: |
| ïÃâ÷ Pulse Generation and Control |
| ïÃâ÷ Digital to Analog Conversion |
| ïÃâ÷ Digital Display |
A. Pulse Generation and Control |
| The sample voltage,Vin is applied to a comparator. A 555 timer continuously generates pulse at a certain frequency. The output of the comparator and the clock is then fed into a 3-input AND gate. Another input is to be used for controlling over voltage that is out of range. |
| Initially the internal voltage is lower than the sample voltage, so the comparator provides logic 1. The output of the AND gate resembles a square or rectangular wave. The output of the AND gate is fed as clock to cascaded synchronous binary counters and BCD counters. When the conversion is over and Vgen exceeds Vin the comparator generates logic 0 and shuts off the infinite pulse train. |
| When the sample voltage is beyond the range specified (30.00 V), a NAND gate detects the presence of two 1’s in the binary-coded leftmost digit and produces a logic 0 that shuts off the pulse train. |
B. Digital to Analog Conversion |
| The output of the binary counter is converted to an analog voltage, Vgen by a D/A converter and then sent to a comparator to compare successively. |
| The basic conversion process in 4-bit R-2R DAC is shown below [2]. If the data bit is low, current is switched to ground whereas if the data bit is high, the current is switched to Op-Amp |
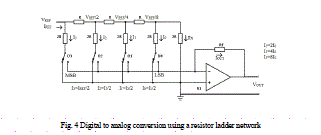 |
| Fig. 4 Digital to analog conversion using a resistor ladder network |
| Thevenin Equivalent of the entire ladder network is R. the current entering through the reference terminal is given by |
 |
| This reference current is then split into two parts at every successive node. Current controlled by the LSB switch |
 |
| If a data bit is HIGH, its corresponding rung current flow through the Iout bus. The output current is then converted to equivalent voltage using an Op-Amp. |
| If D is the decimal value of the 4-bit input word current flowing through the output bus, |
| Equivalent voltage for the input word |
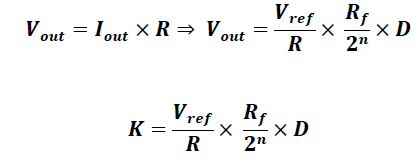 |
| Voltage resolution for 1 LSB [3] |
| In our project we have set Vref = 5V, R = 10kΩ, Rf = 512Ω to achieve required resolution. |
C. Digital Display |
| When the internal generated voltage crosses input voltage the comparator generates logic 0 and then the counters hold their value as they receive no more clock edge. At the point of time, the output of the BCD counter is a digital code analogous to the input voltage. The BCD counter exhibits the output in 7 Segment Display via 7 Segment Display Driver. In this project Common Anode 7 Segment Display and Active Low 7 Segment Display Driver 7447 have been used. |
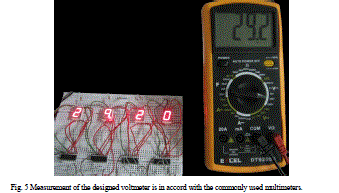 |
| Fig. 5 Measurement of the designed voltmeter is in accord with the commonly used multimeters. |
FEATURES |
| Features of the designed voltmeter are as follow: |
| ADC is specified in number of counts. We have designed for 3000 counts with 1mV /bit resolution. Therefore original operating range is 0-3V. It was tested that in this interval it will provide the best precision. |
| The voltmeter designed can measure up to 30.00V with 0.01V precision. It can be used for extended operating range and stepping down of voltage using a resistor divider network will do. Simultaneously its resolution will be scaled by the same factor. For example, it can measure up to 300.0V with 0.1V precision. |
| It has a reverse polarity indicator. When a negative voltage is applied, the zero crossing detector sends a signal to a LED and prompts the user to reverse the leads. |
| It contains an over-voltage detector. When a voltage greater than 30.00V is applied, its voltage level detector sends signal to a LED. |
LIMITATIONS |
| Though it was tried heart and soul to make it flawless, due to time constraints and some other reasons the implemented voltmeter has some lacking. |
| Ideally a digital voltmeter should measure voltages with both polarities. |
| The designed voltmeter indicates an over voltage if a voltage above 30.00V is applied to input terminals but it lacks in safety requirements. In practical aspects, it should disconnect the circuit in case of over voltage and there should be arrangement for bypassing the overvoltage. |
| The basic problem associated with the staircase approximation, if the sampled voltage is time-varying, output may not follow input all the time. If the sampled voltage falls to a lower value, display will show the value prior to the change. |
ERROR ANALYSIS |
| Several errors were associated with A/D and D/A conversion process. Those errors are described below. |
A. Quantization Error |
| The displayed voltage is the mere no. of steps required in the conversion process. Therefore the accuracy lies within 1 step size of the actual voltage and error is dependent on the step size. |
B. Offset Error |
| Offset error exists if the device shows an output value when the input is zero. Offset error may be positive or negative. |
C. Gain Error |
| Gain error means deviation in the gain achieved and the gain desired. Gain error is measured over the full scale output. |
D. Performance Evaluation |
| As in the operating range 0 to 30.00V we have 10mV/bit resolution. Therefore quantization error is negligible. There wasn’t any offset error at zero. But offset error may sometimes occur at a nonzero value. There was gain error, when the digital output shows 3000 internally generated voltage varied from 2.85 to 2.95 volts. There was also nonlinearity error, as evident from gradual diminishing of deviations at higher input values. |
E. Error Reduction |
| The voltage resolution depends on resistor values and the reference voltage. Therefore for accurate measurement, |
| Usage of high precision comparator. |
| Usage of resistors with low tolerance margin. |
| Usage of reliable source to deliver constant 5V. |
| While working, some problems emerged and solved eventually i.e. |
| The output of the timer contained ripples. To improve ripples we used Schmitt Trigger. |
| The sample voltage got dropped down when connected across the input terminals. To remove this we used buffer. |
CONCLUSIONS AND FUTURE WORK |
| The cost of the project was quite low and can be considered as competitive in comparison with the existing products in the global market. And another important feature is if necessary it can be operated more precisely without any extensive changes in the design. Only by inserting another binary counter, BCD counter [4], display driver and Common Anode 7 segment display each 1mV precision can be achieved. High-impedance precision full wave rectifier circuit [3] acts as an absolute value circuit and can be incorporated to provide the capability of measuring negative voltage. Usage of bidirectional counter [5] will enable to real time measurement of continuously varying voltage. Nevertheless, it exhibits the basic working principle of a low cost Digital Voltmeter. It will certainly turn into a marketable product with some modifications and error reductions. |
References |
|