ISSN ONLINE(2319-8753)PRINT(2347-6710)
ISSN ONLINE(2319-8753)PRINT(2347-6710)
Venkatraman R1, Raghuraman S2, Kabilan S3, Ajay Kumar KS4, Balaji R4 and Viswanath M4
|
| Related article at Pubmed, Scholar Google |
Visit for more related articles at International Journal of Innovative Research in Science, Engineering and Technology
Equal Channel Angular Pressing (ECAP) is a metal forming technique used to produce Ultra-Fine Grain microstructure through severe plastic deformation. This experimental study involves subjecting the pure Aluminium samples processed by powder metallurgy route to conventional hot extrusion at a temperature of 400°C, followed by ECAP at room temperature via processing route A and route C using a die having channel angle of 110° for 2 passes. Microstructure studies and Hardness measurements were carried out and it was observed that after subjecting the samples to ECAP, the grains are slightly elongated; whereas it was found to be equi-axed before processing by ECAP. The refinement of the grains and the hardness of the samples are found to increase with multiple passes which complies with the studies carried out using the commercial Al samples. The present study aims at observing the densification behavior along with the development of refined grains after ECAP in materials processed by powder metallurgy technique since there is no considerable literature regarding processing of pure aluminium through P/M route. Materials processed by P/M technique will find high recognition in future and hence their property enhancement will be an important area of research
Keywords |
| SPD, ECAP, UFG, Strain hardening. |
INTRODUCTION |
| The materials with Ultra-Fine Grain structures are said to be having very good tensile properties. Bulk materials cannot be formed with UFG structure so it can be attained using Severe Plastic Deformation (SPD) techniques. ECAP is considered as one of the renowned techniques for producing ultra fine grain structure through severe plastic deformation. A large amount of shear strain is induced into the material without changing the dimensions of the billet (saravanan et al., 2006) [25]. The materials processed through ECAP are found to have unusual properties appear such as improved density, high tensile strength, ductility and the possibility to get super plasticity at low temperatures (Horita et al., 2001; Xu et al., 2004) [1, 7] The uniformity of the effective strain distribution in the work piece characterizes the deformation uniformity which in turn contributes for the grain refinement. The process involves pressing of work piece through a die containing two channels of equal cross-section intersecting at an angle of 2Ф called as Channel angle. The work piece does not undergo any change in dimension. The strain imparted on the work piece depends mainly on parameters that include the angle between channels of the die, the angle of curvature and the processing route followed during the process. The general processing routes followed are A, BA, BC and C. In route A, the material is passed as it is obtained from previous pass without any change in angular orientation, in route BA , the specimen is rotated by 90° to the initial stage in alternate directions, in route BC , the specimen is rotated 90° either clockwise or anticlockwise to the initial position and in route C the specimen is rotated 1800 in consecutive passes. In ECAP simple shear occurs on the plane of the die channel intersection, which is perpendicular to the flow plane, and in the direction of the bisector of the die angle. (A.P. Zhilyaev et al.,) [30]. |
DESIGN OF DIE |
| A. Selection of Channel angle and Corner angle |
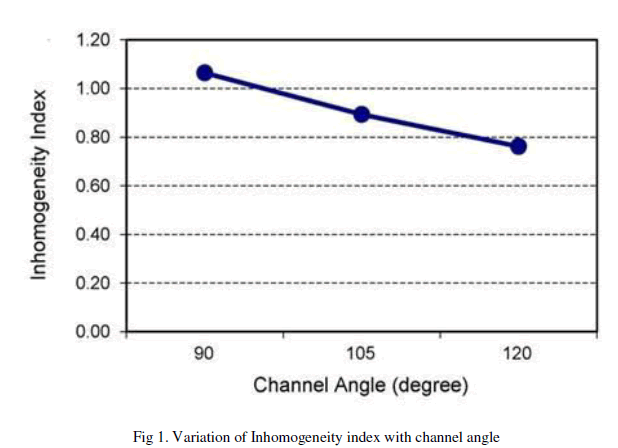
| The selection of the channel angle (Ф) and the corner angle () is very important while designing the equal channel angular extrusion/pressing die. Die angles Ф and can defined as the angle between the two intersecting channels and the curvature of the outer arc of the two channels. The influence of the value of channel angle Ф was evaluated theoretically using finite element modeling and software packages by Iwahashi et al [22] using pure Al by passing through dies with Ф = 90°, 112.5°, 135° and 157.5° and Y = 20°, 30°, 13°, 10° respectively. It was observed that the imposed strain during ECAP has little dependence on as compared to that of Ф. Experiments revealed that by increasing the values of Ф it takes more number of passes / pressings to achieve the same strain in samples and hence for grain refinement leading to formation of ultrafine grain structure with the same grain sizes. Even though it is clearly evident that by opting for a channel angle less than 90° would produce finer grain sizes, it is not preferred as it was investigated that difficulty in processing ECAP using a definite pressure increases with decreasing values of Ф. It was observed that the strain imparted to the material is higher for Ф =90° causing it to have more inhomogeneity and very low for Ф =120° which also results in lesser grain refinement. Thus an optimum value of channel angle like Ф =105° will have optimum levels of strain hardening, homogeneity and grain refinement which will make it widely preferred resulting in material improvement with low internal stresses (shown in figure 1). |
 |
| When a material is processed through ECAP only simple shear deformation take place in the material. When the corner angle decreases, shear deformation takes place in the bottom side too. Moreover, for increased corner angles, the gap reduces and allows the material to flow smoothly thus reducing the load required for deformation. Inspite of increased strain above 40° corner angle, the average imparted equivalent plastic strain decreases. So, it is better to have a corner angle less than 40° to impart higher strain to the material. The corner angle may vary for different materials considering the material property and effect of friction during the process. (I.Balasundar et al.,) [6] |
| A.2. Processing route: |
| The processing route plays a crucial role in changing the microstructure and grain size of the processed material. Processing route is nothing but the change in orientation of the billet between successive extrusions. They can be classified into four routes A, B, C and D or A, BA, C and BC respectively. (i) In Route A, the billet is not rotated between successive passes i.e. 0° rotation.(ii) In Route B or BA, The billet is rotated 90° clockwise and counterclockwise alternatively i.e. 90°, N even, 270° N odd. (iii) In Route C, The billet is rotated 180° between successive passes. Route D or BC: The billet is rotated 90° clockwise after each successive passes. |
| Many investigations were carried out to analyze the influence of processing route on the microstructure after ECAP. Ferrase et al. compared directly the efficiency of the processing routes A, BA and C for establishing a homogenous structure consisting of an array of equi-axed grains in investigations conducted on copper and aluminium alloys. It was concluded that by processing through route C, more homogenous and equi-axed structure when compared to routes A and B. Iwahashi et al. [22] showed that the evolution of the desired microstructure can be achieved more rapidly using processing route BC. D.Nagarajan et al.[4] had concluded that the hardness for samples processed out of route C is higher than that obtained through route A. The reason behind this feature is that rotation causes increase in dislocation interactions on intersecting slip planes. Due to increased inhomogeneity, the pressing pressure required is more for route B when compared with other schemes. (Venkatachalam et al., 2010) [19]. |
| A.3. No. of Passes: |
| The main advantage of the ECAP method is the ability of subjecting the specimens to repetitive pressings and strain accumulation. According to Iwahashi’s equivalent strain equation, there strain obtained through ECAP is directly proportional to the number of repetitive pressings. Hence, the number of pressings influences the characterization of materials when processed through ECAP.The refinement of grain sizes is not simply proportional to the number of pressings as the relationship between the total strain and the number of pressings. It was observed that the grain size decreases significantly after a single pass of ECAP, but the grain size remains almost constant or decreases slightly in subsequent pressings. It was also confirmed after observing the microhardness variation with increasing number of passes. |
| The number of passes also influences the homogeneity of the microstructure and contributes to accumulation of stresses and dislocations found evident in case of processing route BC. In general, the number of pressings tends to increase the yield strength and hardness. The % elongation and grain size tends to reduce. However these changes are restricted to only a few subsequent passes. Any increase in passes will have no or derogatory effects on these properties. |
 |
EXPERIMENTAL PROCEDURE |
| The current study involves preparation of samples of pure Aluminium, processed through Powder Metallurgy route. The Aluminium powder is first compacted, and the end product is then sintered. The sintered specimens are then subjected to hot extrusion, for reduction in diameter followed by ECAP at room temperature via processing route A (0° rotation) and C (180° rotation) for 2 passes. |
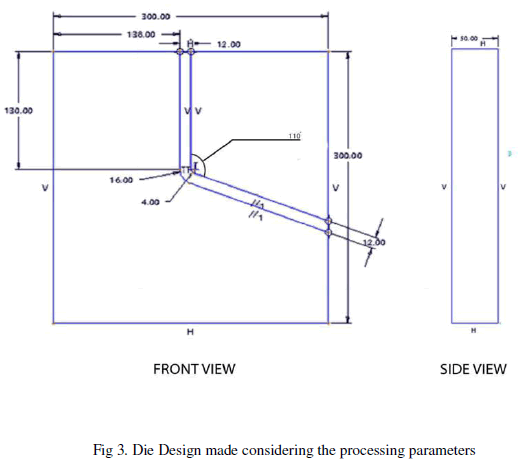
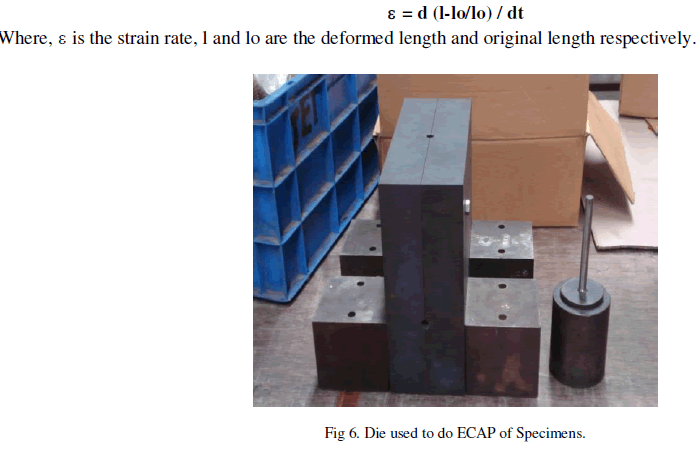
| The die used for the ECAP process, consists of two channels of circular cross section with diameter 11.8mm intersecting at a channel angle of 110o. The specimens were subjected to ECAP for two passes with a controlled strain rate and load conditions. |
| Microstructures observations were performed on the specimens before and after each stage of ECAP, for two passes, using an Optical Microscope. Micro hardness readings were observed for the specimens in a similar fashion using a Vickers Micro hardness Tester. |
| A. Preparation of Specimens |
| A.1 Selection of Composition: |
| Chemical composition of the powder samples used for the ECAP process: |
 |
| The compositions of the specimens were found out using a portable alloy analyzer. The components were selected to be constituted majorly of Aluminium solely for academic purposes. |
| A.2 Compaction |
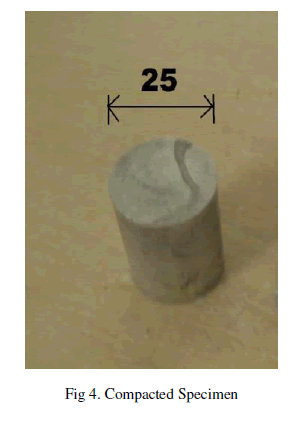
| Pure Aluminium powders were taken and compacted in a die and a uniform load was applied to the punch. The amount of powder to be compacted for the preparation of each specimen was calculated using density and volume relations, and assuming the density of the final compacted specimen to be 90%. The dimensions of the compacted specimen were found to be 24.9-25.1 mm in diameter, and 25 mm in length. (L/D=1). A compressive load of 22 tons was applied for compaction of the specimens, beyond which compression cracks are found to develop thereby damaging the compact. |
| A.3 Sintering |
| Sintering of the compacted specimens was carried out in a muffle furnace. As the melting point of Aluminium is 660oC, the furnace was heated to 500oC (75% of the melting point). Sintering was done in an environment of Nitrogen or argon, to prevent the formation of undesirable films on the surface of the specimens, such as oxides and scales. The duration of sintering was 60 minutes. The dimensional change during the sintering process is not significant however, very minute shrinkage is possible. |
 |
| A.4 Hot Extrusion: |
| Extrusion of the sintered specimens was carried out in a 200T friction screw press. The extrusion temperature was estimated by trial and error method. When the temperature was first fixed at 350 °C, the extrusion was incomplete with formation of cracks in the extruded portion of the metal. When the pre-heating temperature was increased to 550°C, the desired length of the end product was obtained, but about 30% of the length was hollow due to increased metal flow. When the specimens were pre-heated to a temperature of 400°C it was found that the metal flow was optimum. Therefore for further extrusion operations, the specimens were pre-heated to 400°C. The specimens were then subjected to extrusion in a die, and an impact load was applied using a friction screw press. |
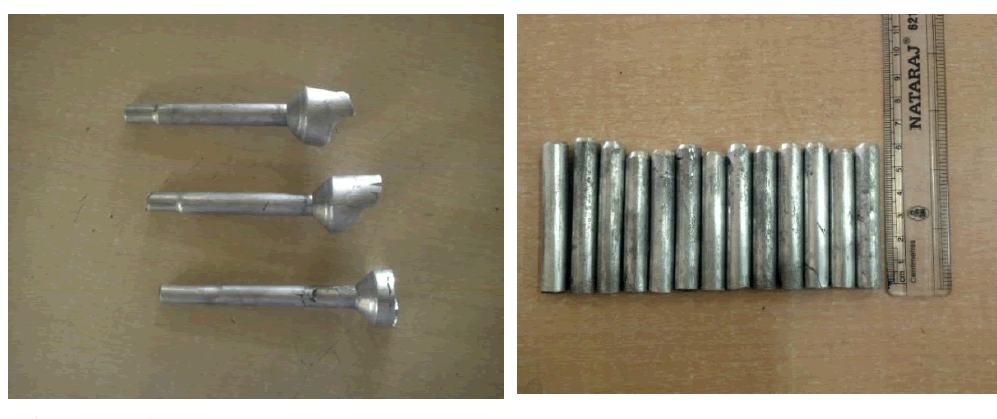 |
| Fig 5. Compacted and Sintered specimens are subjected to hot extrusion (a) After extrusion (b) After removing the flash |
| B. ECAP: |
| The die consists of two channels of equal diameter, and is designed in such a way that these two channels intersect at an angle Ф =110o. The extruded specimens were processed using the ECAP die. The load applied increased for successive passes due to strain hardening. Out of the processing routes A, B and C, processing routes A (0o rotation) and C (180o rotation) were adopted for the experiment. Although grain refinement is more in processing route B (90o rotation), Ba or Bc was not adopted because, it was found that there was a significant increase in load applied after every pass of the billet due to build up of large internal stresses and inhomogeneity. (Venkatachalam et al. 2010) [19]. A uniform strain rate of 0.1s-1 was applied for the process. Surface irregularities were avoided using uniform strain rate. The specimens were dressed every time before subjecting it to further processing Strain rate is obtained by dividing the extrusion speed by unit time. It can be calculated by the expression |
 |
ANALYSIS OF EXPERIMENTAL RESULTS |
| A. EFFECT OF PROCESSING ROUTE ON MICROSTRUCTURE |
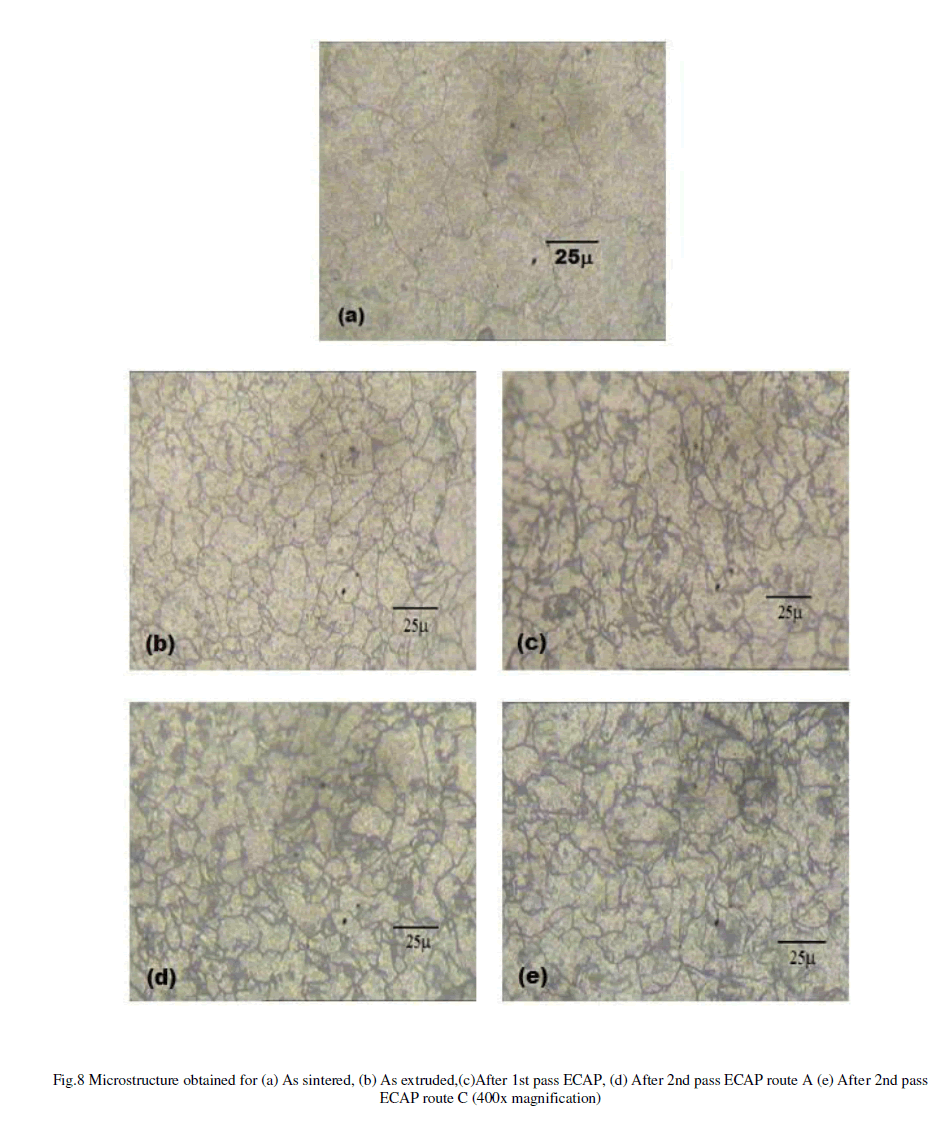
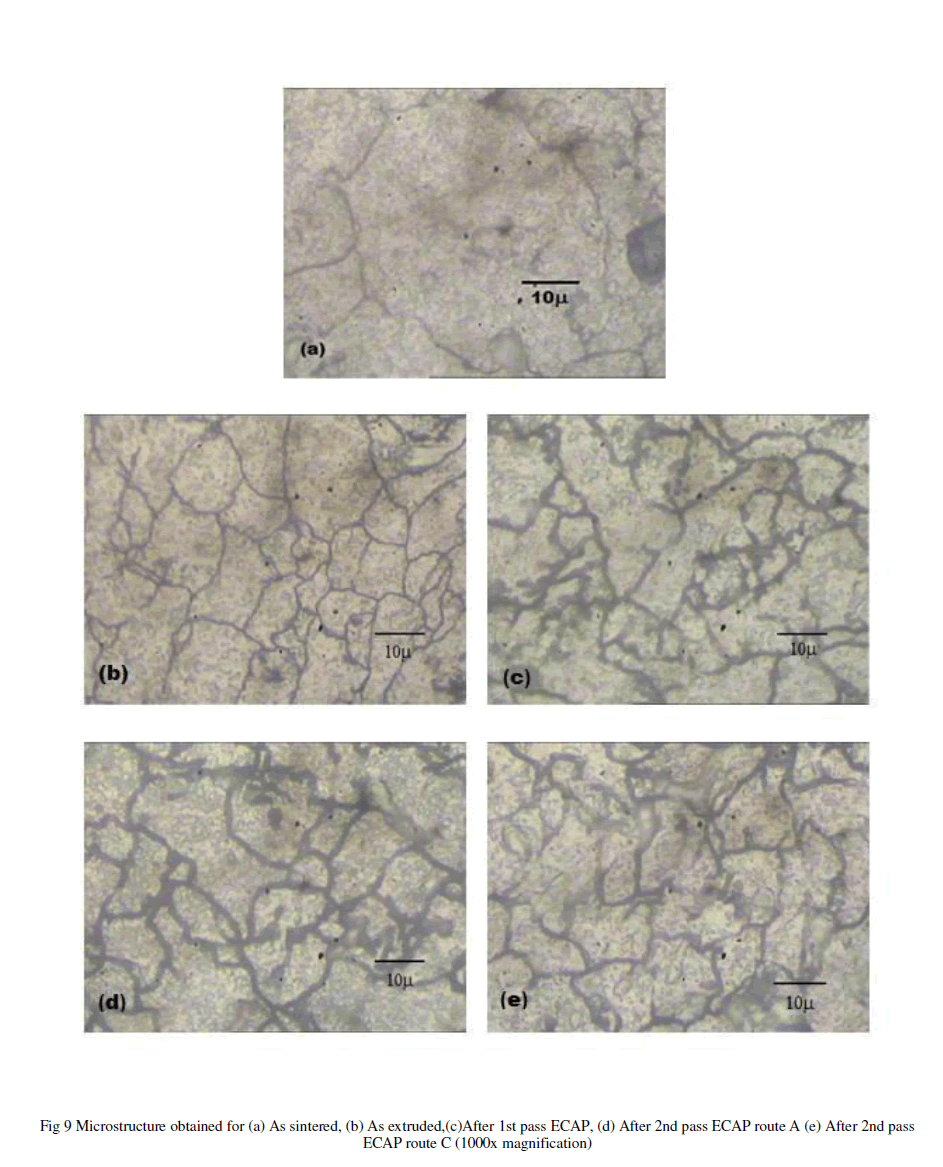
| The samples after subjecting to equal channel angular extrusion / pressing, their microstructural characteristics was studied subsequently after each pass. The figure 8 and 9 shows the microstructures obtained for pure aluminium processed by powder metallurgy route under different magnifications of 400x and 1000x respectively. The figure 8 (a) shows the grains present in sample in the as sintered condition. Large grains of the order of about 50-60 microns in dimension (approximately) can be clearly seen. |
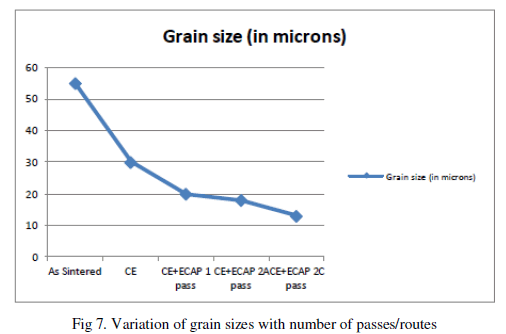 |
| Fig 8. Show the microstructure of samples that were subjected to hot extrusion process. It can be clearly seen that the grain size has been reduced to 25 to 30microns in dimension. This is due to the fact that grain refinement occurs even after conventional extrusion. Fig 8 (c), (d) and (e) shows the microstructure after first pass, second pass route A and second pass route C after subjecting each specimens to hot extrusion prior to ECAP. It can be observed that the grain refinement occurs with increase in ECAP passes. It can also be observed that the grains size after HE+ECAP 2C (Hot extruded specimen subjected to ECAP for 2 passes by route C) is lesser and more uniaxed when compared to HE+ECAP 2A. This can be due to the fact that the material is subjected to more strain hardening and change in orientation of the billet helps in achieving uniaxed grains. |
| It can be seen that the grain sizes are elongated after subjecting the specimens to 1st pass. This effect can be observed nicely in ECAP 2A microstructure too. This is accompanied with a reduction in grain size showing the evidence of grain refinement. A few large grains can be observed in the microstructure owing to incomplete strain hardening because relatively low strain hardening occurs when the channel angle is less than 100°. Only few pores is visible after the extrusion process because of the densification process. |
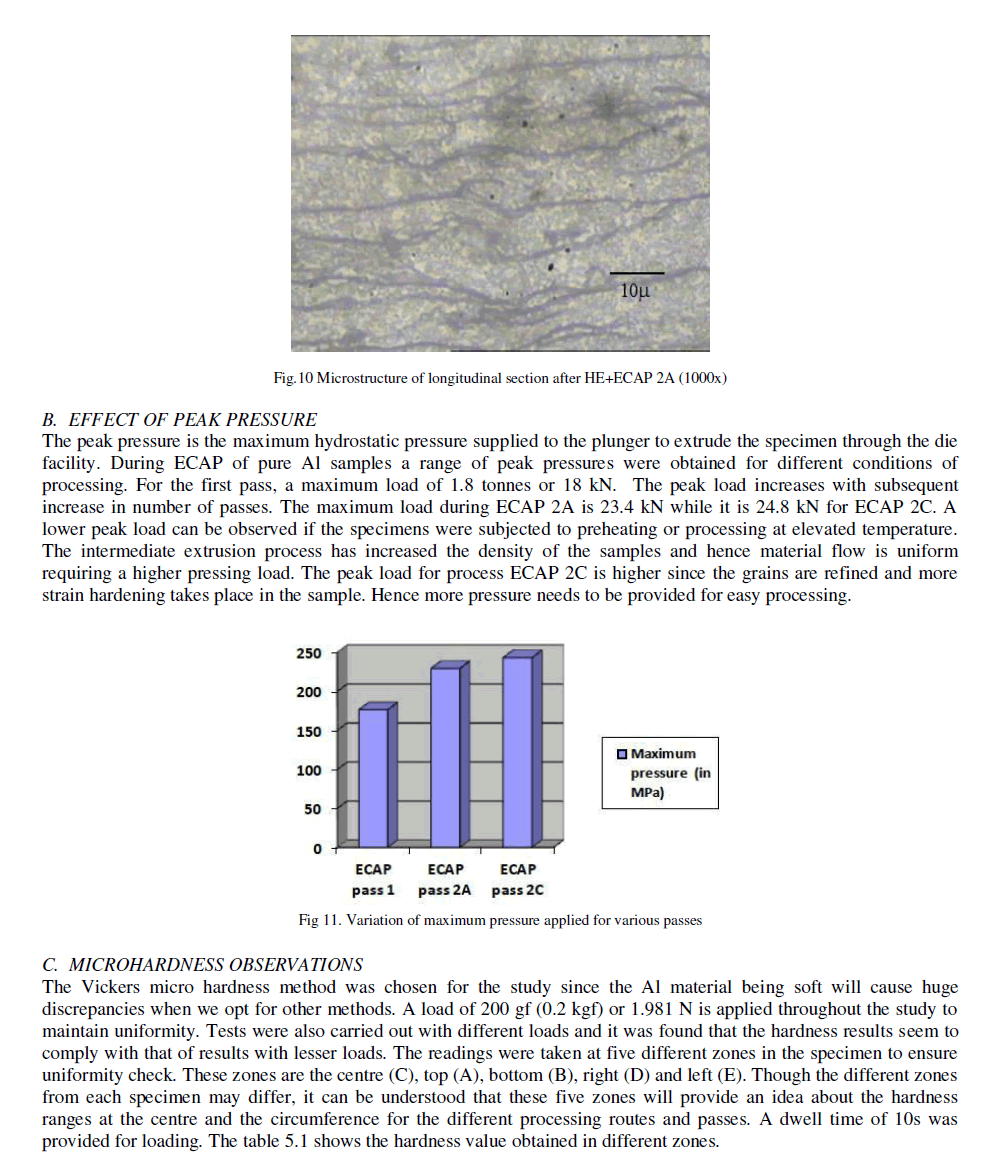
| Fig 10 shows the microstructure of a longitudinal section of a sample that has been processed through route 2A by ECAP after subjecting it to hot extrusion. It can be clearly seen that the grains are vey elongated (length more than 50 microns) and have less than 10 microns in width. This shows the direction of deformation of material. With further passes the width of the grain banding tends to decrease. |
 |
 |
 |
 |
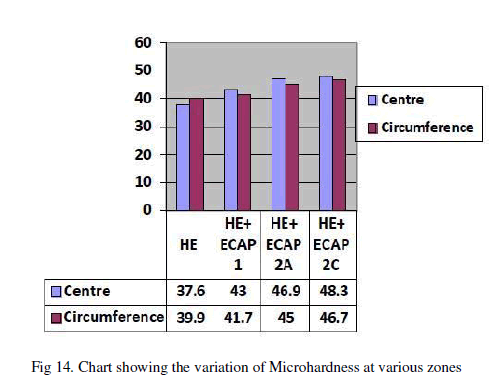 |
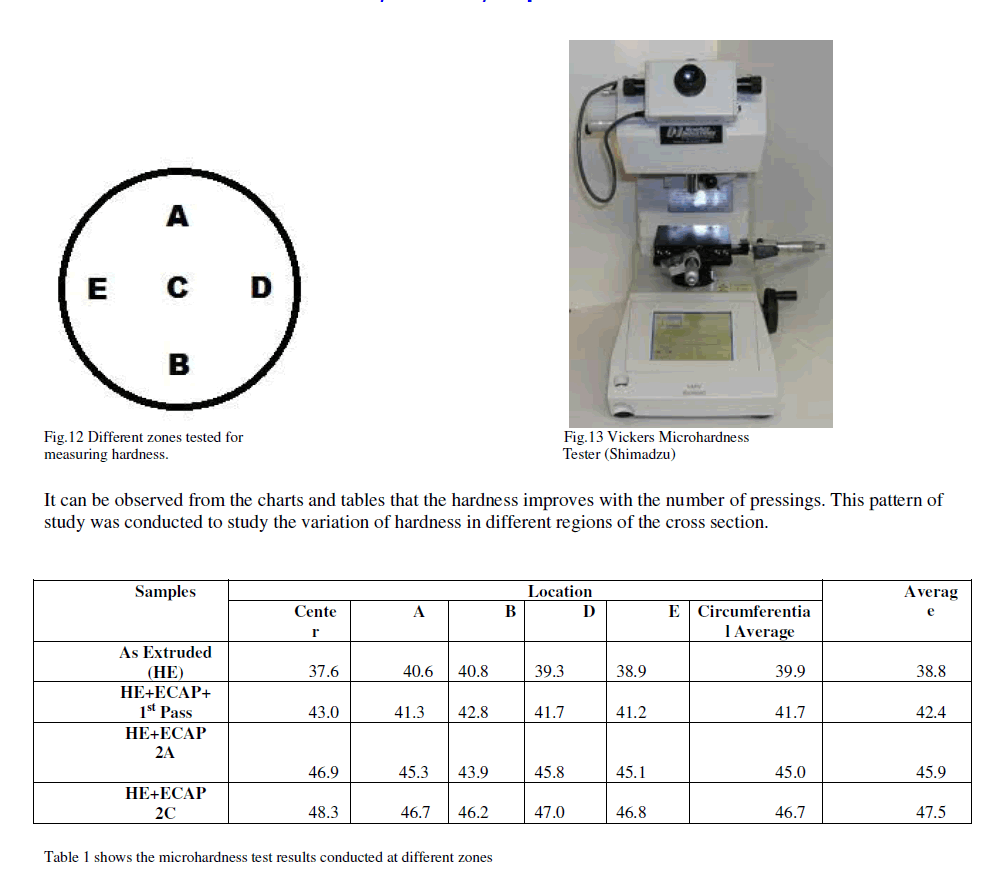
| The microhardness test was conducted to HE+ECAP 2A (Hot extruded specimen subjected to ECAP for 2 pass by route A) specimen to analyze the hardness along the longitudinal section. The centre region had a hardness value of 44 HV. The top and bottom portion had a hardness value of about 43.1 HV and 44.7 HV respectively. The bottom portion corresponds to the bottom surface of the specimen which was away from the corner during ECAP. The hardness values of processing route C are found to be higher and more homogeneous than that of A which complies with several previous research results. Though there is a marked increase in hardness after extrusion and 1st pass and also after few passes of ECAP, it is concluded from the study that the increase in hardness tends to stop after the material gets subjected complete strain hardening i.e. after 5 or 6 passes. Flow softening is a process where the samples undergo inhomogeneous deformation and flow localization. Because of this inhomogeneous deformation, the material experiences irregular strain distribution. Due to this irregular strain concentration coupled with material loading at a higher strain rate and friction cause the occurrence of shear bands. Shear banding tends to stress the material more and more and the samples prepared by powder metallurgy which are prone to crack propagation due to their residual porosities, cannot sustain more stresses until they fail by developing a crack. To prevent the hard effects of such inhomogeneous deformations, an optimum strain rate and a corner angle of about 70° with inner fillet radius more than 4 mm is suggested. |
CONCLUSION |
| The present study involved ECAP of 99.5% pure Aluminium samples for two passes by processing routes A and C in a ϕ12mm die having ɸ=110° and ψ=70°, after subjecting it to an intermediary hot extrusion process to achieve reduction in diameter as well as densification of the compact. The samples after each stage were prepared to study their microstructural characteristics and it was observed that grain refinement occurred with a reduction in grain size of about 40 microns i.e. from 50 microns in as sintered condition to 12 microns after 2 passes by processing through ECAP. The in homogeneities in the microstructure tend to increase immediately after 1st pass and then the results in the formation of uniaxed fine grains in successive passes. The grain size decreases with each successive pass by ECAP and may help in achieving ultrafine grain size after several passes i.e. after n = 6 to 8. The microhardness observation revealed that hardness of the material got increased by more than 10 HV after extrusion. Densification was quite prominent and reached about 99.4% after 2 passes. The study confirms the utilization of ECAP as a tool for grain refinement for samples produced from powder metallurgy route. |
References |
|