ISSN ONLINE(2319-8753)PRINT(2347-6710)
ISSN ONLINE(2319-8753)PRINT(2347-6710)
Atul Modi1, Sujeet Pratap Singh Baghel2 , Yash lambhate3
|
| Related article at Pubmed, Scholar Google |
Visit for more related articles at International Journal of Innovative Research in Science, Engineering and Technology
Coordinate measuring machine is an important element of coordinate metrology and reverse engineering. Performance variations of actual shape and dimension are a serious problem. By help of robust design the different parts and elements are to be improved for consistent performance & R & D activity. The robust design is also useful to control different losses developed during the manufacturing process.
Keywords |
| Coordinate measuring machine. Air bearing, Robust design. |
INTRODUCTION |
| Coordinate measuring machines are relatively recent developments in measurement technology. The Coordinate Measuring Machine (CMM) plays a vital role in the mechanization of the inspection process [3]. There has been growing need to have an apparatus that can do faster first piece inspection and many times, 100% dimensional inspection [2]. Some of the CMMs can even be used as layout machines before machining and for checking feature locations after machining [8]. CMM are versatile in their capability to record measurement of complex profiles with high sensitivity of 0.25 um and speed. Air bearings are main component of any CMM. Air bearings are preferred in CMM because they can be very repeatable, and they allow a machine design that is more economical to build because any hard, flat surface is suited as a bearing way path[5]. |
| Air bearings use a thin film of pressurized air to provide an exceedingly low friction load-bearing interface between surfaces. The two surfaces do not touch. They are contact-free so, air bearings avoid the traditional bearing-related problems of friction, wear, particulates, and lubricant handling, and offer distinct advantages in precision positioning, such as lacking backlash and static friction, in high-speed applications also. The fluid film of the bearing is air that flows through the bearing itself to the bearing surface. The performance variation in CMM is the main reason which arises the need for further improvement for consistency like by robust design. |
| Robust design adds a new dimension to statistical experimental design [4]. The quality a customer can receive is that every product delivers the target performances each time the product is used, under all intended operating conditions, & throughout the products the products intended life, with no harmful side effects. The deviation of a products performance from the target causes loss to the user of the product, the manufacturer, & in varying degrees, to the rest of society as well. CMM can be designed in a manner so are less affected by environmental variability to obtain ideal quality output the CMM must delivers on target performance each and every time under all intended operating conditions throughout its life. If CMM performance is not on target it is loss to society, in form of wrong design or manufacturing losses and rejection or scrap. The quality level of a product (CMM) is measured in terms of the total loss to the society due to functional variation & harmful side effects. It explicitly addresses the following concerns faced by all product & process designers[7]. |
| ïÃâ÷ How to reduce economically the variation of a products function in the customers environment . (note that achieving a products function consistently on target maximizes customer satisfaction. |
| ïÃâ÷ How to ensure that decisions found to be optimum during laboratory experiments will prove to be so in manufacturing & in customer environments In a Coordinate Measuring Machine (CMM) which basically consist of a platform on which the work piece being measured is placed and moved linearly or rotated as required for inspection. A probe attached to a head capable of lateral and vertical movements records all measurements. Coordinate measuring machines are also called measuring machines. Coordinate Measuring Machine (CMM) main components are required for precise movement and measurements and are represented in table-1. The design of CMM and its components has influence on its performance so needed robust design[6]. |
 |
 |
III. PRINCIPLE AND TERMINOLOGIES |
| The principle and the working of a Coordinate Measuring Machine (CMM) is depend and controlled by following main parts as in table-2. The figure-2 indicates the different probing system for CMM. |
 |
 |
 |
| Generally, the accuracy of measurements and authenticity of the results from the measurement is in most cases affected by many factors and this is truth also for the measurement by using CMM [10]. Co-ordinate Measuring Machines are built rigidly for very precise inspection. They are equipped with digital readout or can be linked to computers for online inspection of parts as well as for reverse engineering. The machine incorporates the basic concept of three coordinate axes so that precise movement in x, y, and z directions is possible. Each axis is fitted with a linear measurement transducer. The transducers sense the direction of movement and gives digital display. The components are assembled in a manner that so during inspection no problem will encounter due to any variables. |
V.AIR BEARING ROLE IN CMM |
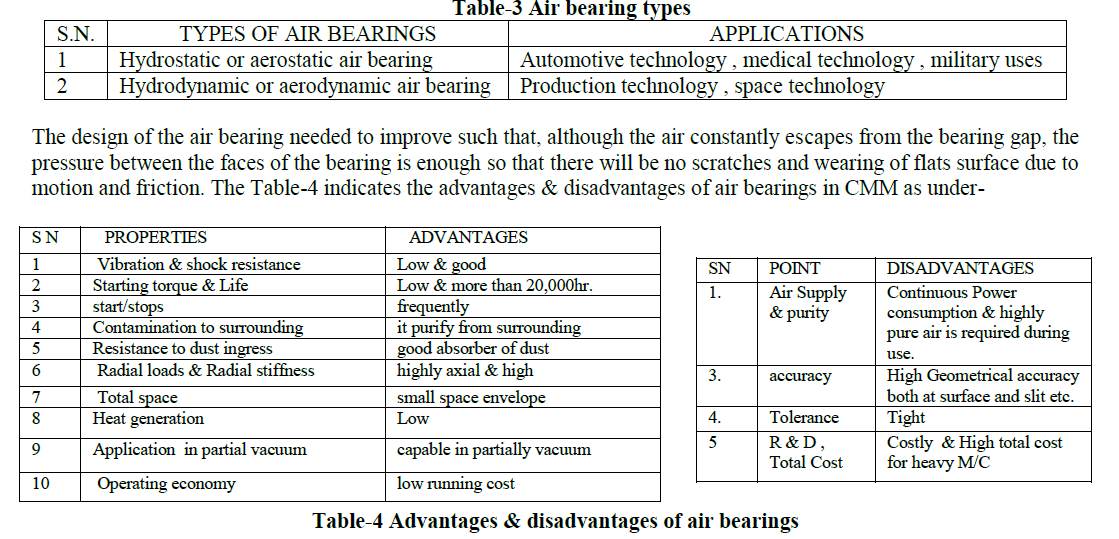
| Air bearings are being mainly used in precision machinery tools (measuring and processing machines) and fast running machines (high-speed spindle). The design of the air bearing is such that, although the air constantly escapes from the bearing gap, the pressure between the faces of the bearing is enough to support the working loads [5]. Thus, there is a differentiation that has to be made between hydro-dynamical bearings, which establish the air cushion through their movement, and hydrostatical bearings, in which the pressure is being externally inserted [8]. Hydro statically bearings does not require air supply and air flow is created by rotation of the bearing itself. The air bearing have various design for controlled air flow and air outlet also and the mounting of air bearings in a CMM as shown in figure-4. The main air bearing types and their applications are shown in the table-3. |
 |
 |
| CMM may contribute a great deal of loss control by product design on target by proper tolerance which may lead to correct assembly and CMM assembly consistent performance during inspection. The moving surface should glide smoothly on the other surface, minimizing the control effort to achieve high accuracy and precision [5]. |
VI. AIR CONTROLLER |
| The CMM uses different air bearings of varying size at a time to operate and rum the machine as desired. The air bearings require air supply and Air flow which is controlled through micro-sized holes or through holes and grooves. Air bearings require clean, dry compressed air requiring multistage filtration in-line to protect against oils, water, and particulates that might reach the bearings and damage the bearings and air regulation valve as shown in figure-5. The air is supplied through PVC tube and manifold. |
 |
 |
 |
VIII. MACHINE DESCRIPTION |
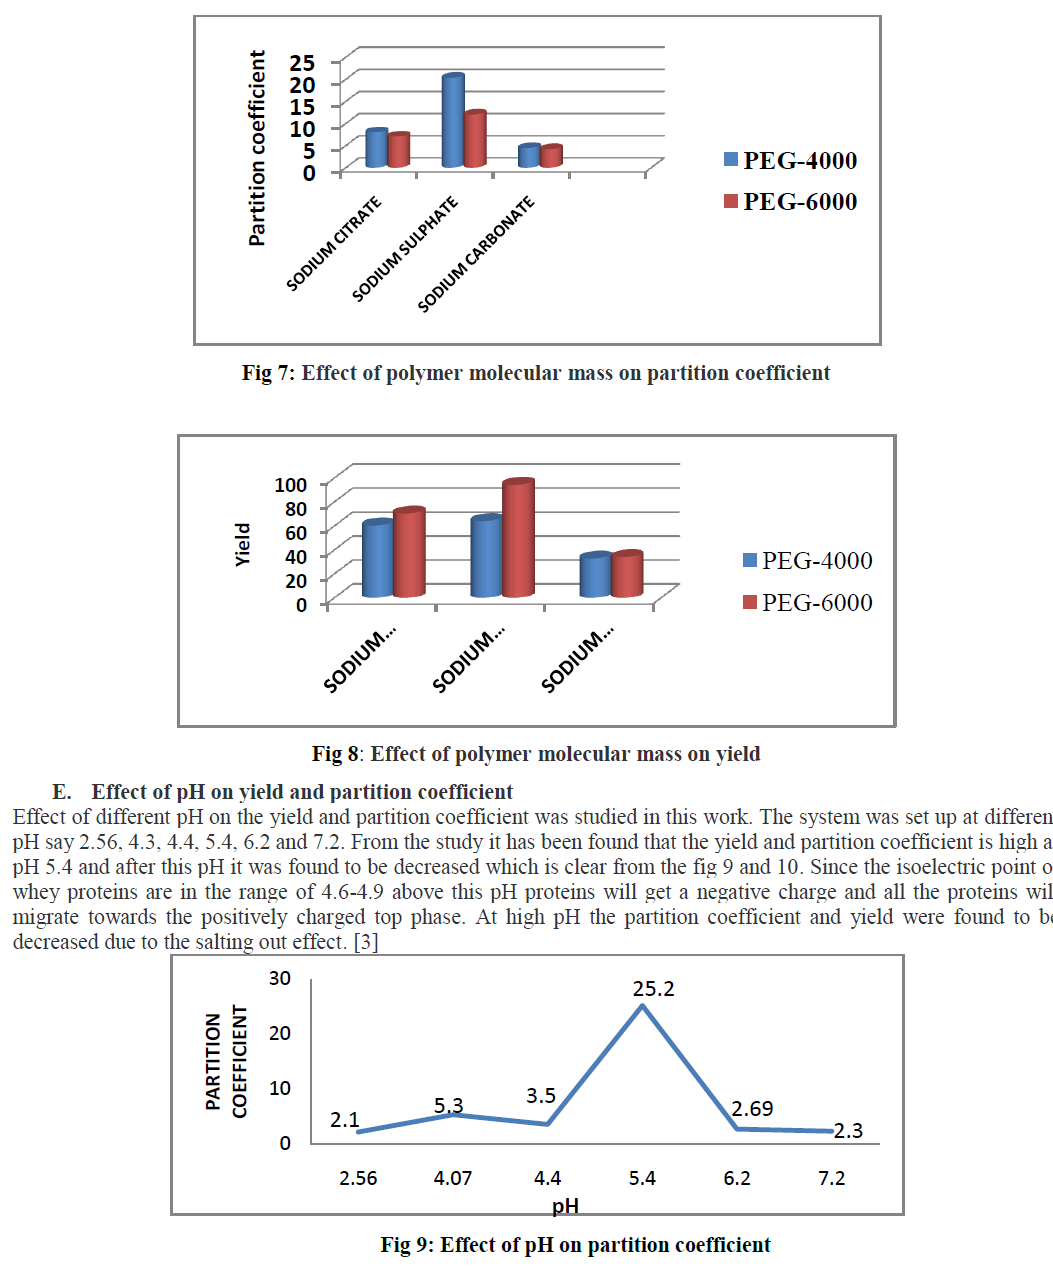
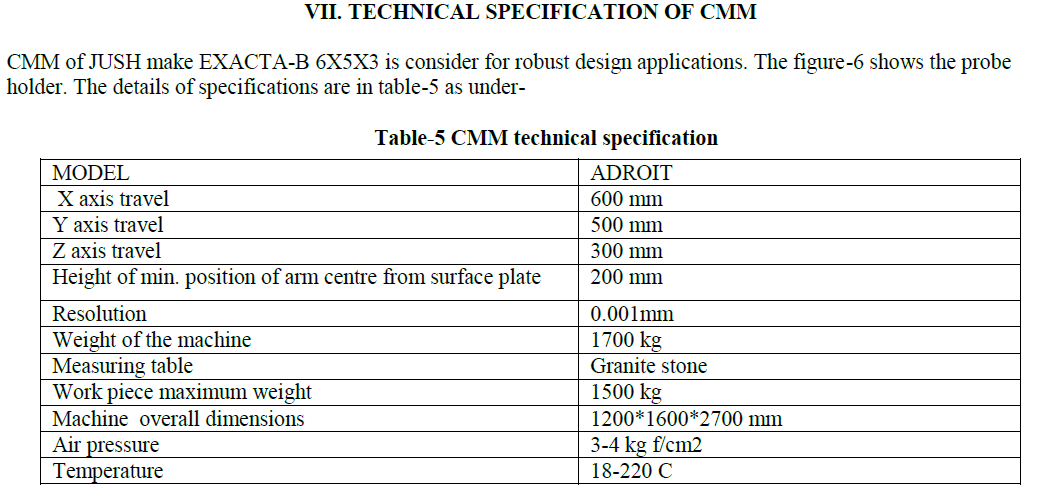
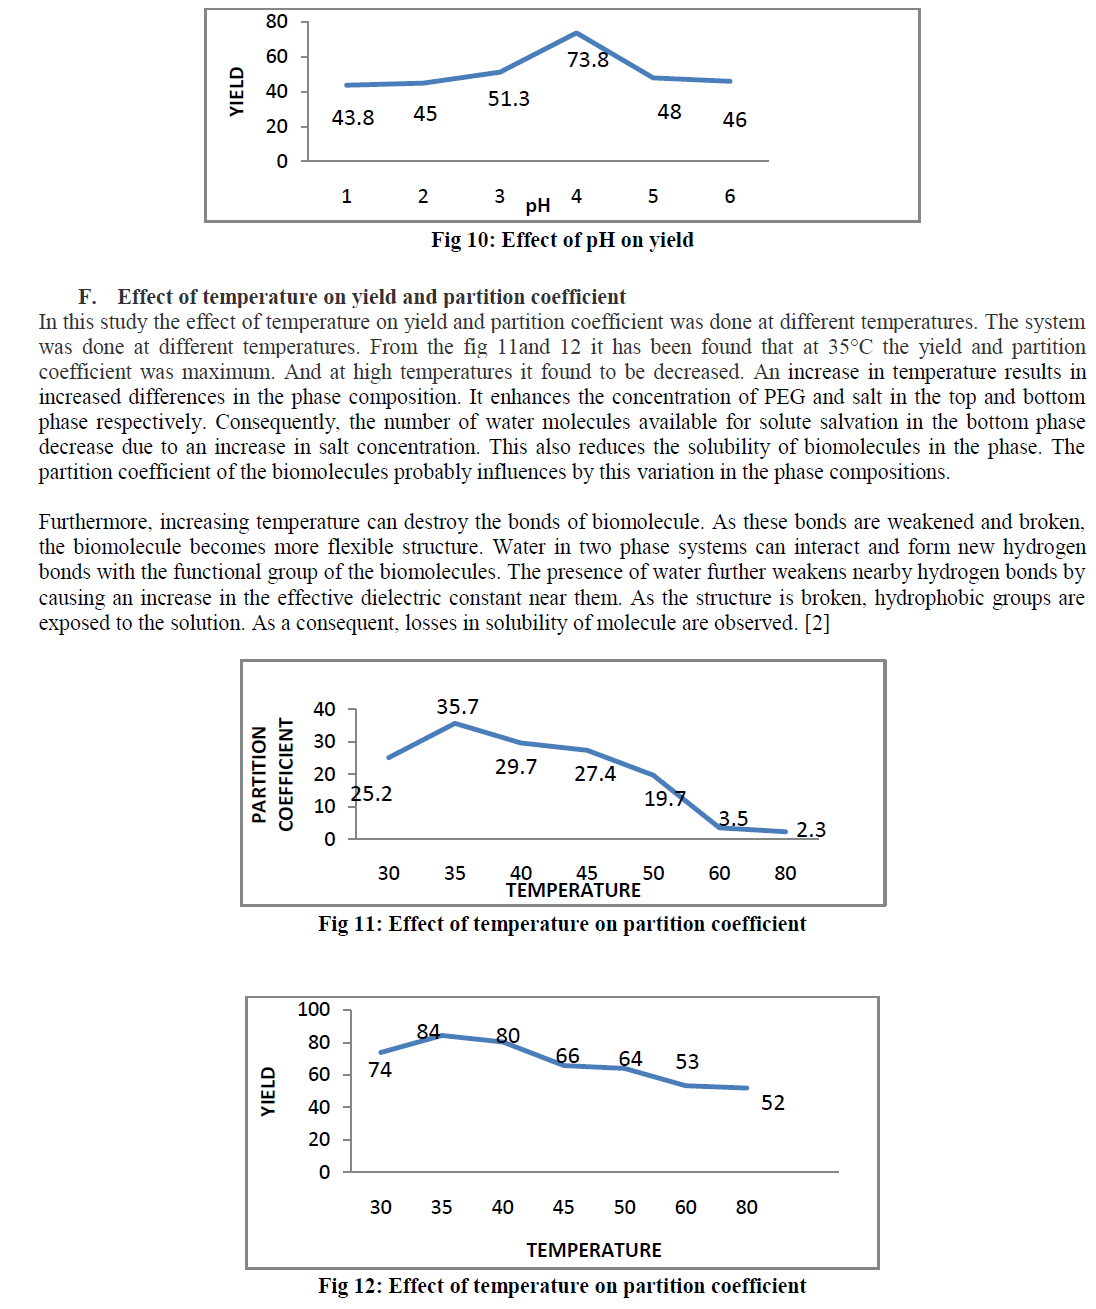
| The JUSH make EXACTA CMM is compact 3D with z column and machine base are made of rigid granite as in figure-7. All axes are guided by high – precision air bearings and the table stand is made of special featuring with low mass and high rigidity. The Multi sensor system consists of the following: |
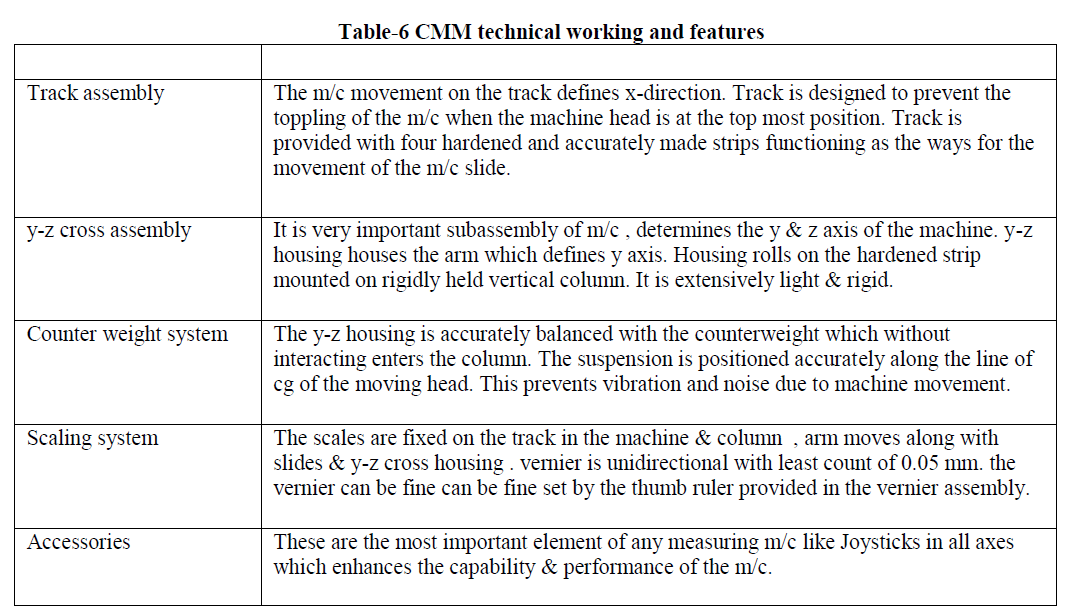
| ïÃâ÷ Touch probe: touch probe system TPS with Renishaw touch trigger probe TP6 and integrated automatic probe changer PAC. (measuring range in x will be reduced by 50 micro mille meter ). Additional probe systems available and rotary tables are optional. Table-6 represents, CMM technical working and features. |
| ïÃâ÷ Drive system: DC servo drives with precision, backlash – free centre mount ball screw and control unit for 3 axes microprocessor with path control and measuring system of linear incremental 0.5micro meter scales. The operator system with Pentium PC processor and windows and universal 3D- multisensory measuring software. The other features in CMM are as under- |
 |
 |
| 1. Several stylus –set combinations. |
| 2. Motorized probe heads (only PMC) . |
| 3. Multiple dynamic touch probe systems offer maximum application flexibility |
| 4. Several probe- changing systems available. |
IX. FACTORS AFFECTING CMM ROBUSTNESS |
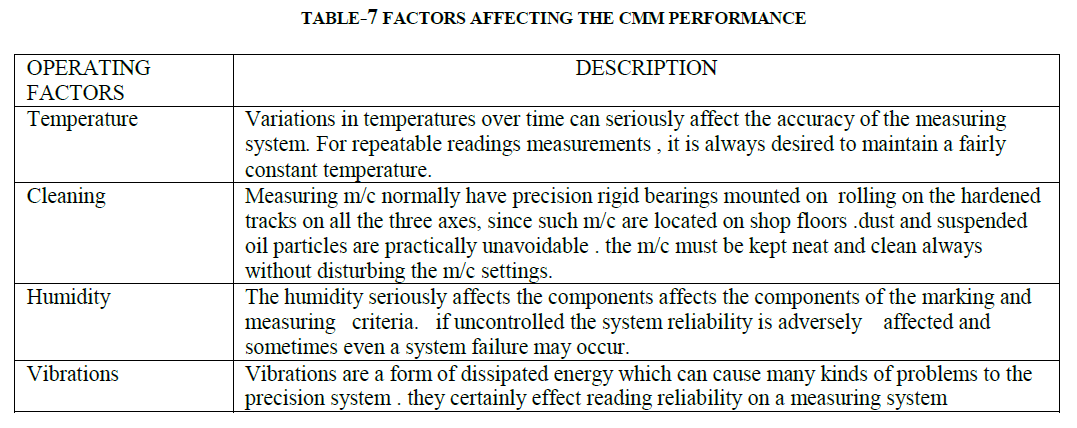
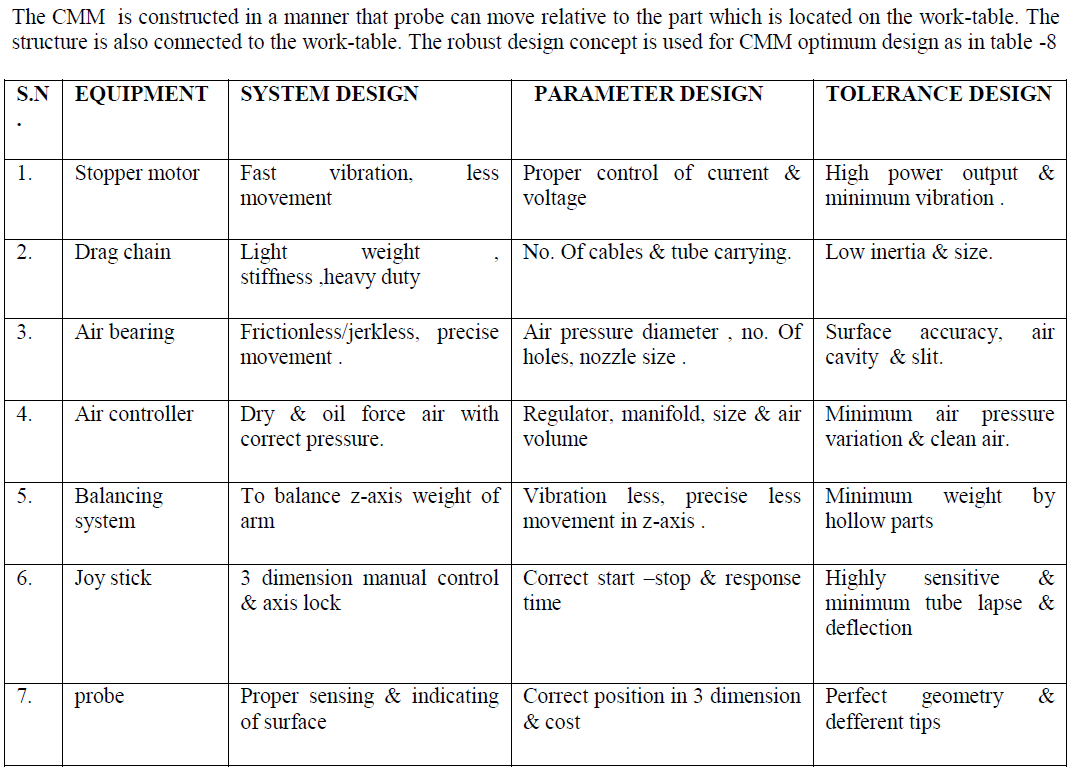
| Robust product or process defined as one that performs as intended even under non-ideal conditions such as manufacturing process variations or arrange of operating situations .The term noise described the uncontrolled variations that may affect performance and we say that a quality product should be robust to noise factors [3]. Robust design is the product development activity of improving the desired performance of the product while minimizing the effect of noise. In robust design we use experiments & data analysis to identify robust set points for the design parameters we can control. A robust set point is a combination of design parameter values for which the product performance is as desired under a range of operating conditions & manufacturing variations [9]. Noise factors are those variables that cannot be explicitly controlled during the manufacturing and operation of the product [2]. Noise factor may include manufacturing variances , changes in materials properties , multiple user scenarios or operating condition , and even deterioration or misuse of the product .The testing noise factor is done by several methods are used to explore the effects of noise factors in experiments [7]. If noise factors can be controlled for the purpose of experiments then it may be possible to directly assess the effect of these noise factors . If the noise factor cannot be controlled during the experiment [4]. They can allow the noise to vary naturally and simply assess the products performance in the presence of noise [6]. The table-7 represents the factors affecting the CMM performance. |
 |
X. OPTIMUM DESIGN OF CMM BY ROBUST DESIGN |
| The aim of robust design is to determine the condition and parameter to minimize the effect of causes of variation. The object is to find the condition that would assure that the inspection and measurement is insensitive to environmental and other factor. The CMM are also made more rugged to resist environmental effects in manufacturing plants due to temperature variations, vibration and dirt etc. operating environmental variable such as temperature , humidity are example of external noise factors, the problem caused by deterioration such as wearing of parts , wrong machine setting are internal noise factors, the unit to unit noise factor indicates the deference between individual performance of same inspection or measurement due to operator or process itself [1].Important features and requirements of the CMMs are: |
| (i) To give maximum rigidity to machines without excessive weight, all the moving members, the bridge structure, Zaxis carriage, and Z-column are made of hollow box construction. |
| (ii) A map of systematic errors in machine is built up and fed into the computer system so that the error compensation is built up into the software. The surface of air bearing should be flat as shown in figure-9, not as figure-8. The air flow should properly controlled as shown in figure-10. |
| (iii) All machines are provided with their own computers with interactive dialogue facility and friendly software. |
| (iv)Thermocouples are incorporated throughout the machine and interfaced with the computer to be used for compensation of temperature gradients and thus provide increased accuracy and repeatability. |
 |
XI. METHODOLOGY STEPS |
| To obtain the CMM performance on targets the three steps methodology are |
| (A) System design It is primary functional design by help of technical knowledge for designed output or target performance It includes elements subsystem and system design by the help of research and innovation. The system of CMM is design for vibration less and friction less movement in all three axis. |
| (B) Parameter designs These steps aims to find setting of operating variables for target or good oriented output. For it mathematical or physical prototype is subjected to planned experiments which is depend on number of measuring points and distribution of measuring points based on different patterns of distribution as well as based on patterns of measuring points distribution depending on the curvature of surface and Styli length and Speed of measuring etc. |
| (C) Tolerance design in this step the product tolerance are determined on the basis of losses developed when performance deviates from the target . this step is last step after system and parameter design .the aim is to minimize the effect of noise factor on manufacturability and cost . In air bearings for CMM, the load is supported by a thin film of pressurized air. Pressurized air is continuously supplied to the bearing surface and escapes through the bearing gap. The continuous flow of pressurized air through the bearing gap is enough to support the load and to reduce the friction as desired for perfect M/C output performances. |
XII. CMM COMPONENTS ROBUST DESIGN |
 |
 |
XII1. RESULT & DISCUSSION |
| Final inspection of any product consist of checks of overall dimensioning, inspection of functional dimensions tolerance and testing of required function. The results of measurements are used then in analysis programmes and R & D work. The CMM should be robust against uncontrollable variations that may affect it performance . The CMM optimum design development by robust design start with system design for required performance in different operating conditions .In this technical knowledge & experience is used for initial feasible design of CMM to fulfil the functional requirements . design of experiments are used to get optimum setting . |
| Robust design will be useful to control uncontrollable variations of CMM performance against noise factors by optimum set points. A robust set point is a combination of design parameters for CMM for which the output performance is as desired with changed working condition. The net output is improvement in performance of all elements & their sequences of CMM under a range of operating conditions & manufacturing variations. The desired combinations of set points of variable which develop sensitivity against uncontrollable situation & variations is obtained. Each component and part of CMM will produce robust output for desired target performance . |
References |
|