ISSN ONLINE(2319-8753)PRINT(2347-6710)
ISSN ONLINE(2319-8753)PRINT(2347-6710)
| Nitesh Dhar Badgayan, Ankan Mishra, Sameer Panda Department of Production Engineering, V.S.S.University of Technology, Burla, Odisha, India. |
| Related article at Pubmed, Scholar Google |
Visit for more related articles at International Journal of Innovative Research in Science, Engineering and Technology
Materials are ubiquitous, no society no matter how primitive or how sophisticated its technology, has ever existed without use and application of a variety of materials. Titanium and its alloys are extensively used in aerospace mainly in airframe construction because of their excellent combination of high specific strength which is maintained at elevated temperature then fracture resistance characteristics and their exceptional resistance to corrosion. Conventional machining of titanium and its alloys is cumbersome owing to several inherent properties of the material. Titanium is very chemically reactive and therefore has a tendency to weld to cutting tool during machining thus leading to premature tool failure Its low thermal conductivity increases the temperature at tool work interface thus affecting tool life adversely, which result difficult to machine titanium and its alloy by conventional machining methods. Also Very few literature is available on context of Surface Roughness analysis of Titanium as per as Ultrasonic Machining of Titanium is concerned. This paper presents investigation of Surface Roughness on Ultrasonic Machining (USM) of titanium (ASTM Grade 2), an attempt has been made to model response variable i.e. Surface Roughness in USM process using Response Surface Methodology (RSM) with DESIGN EXPERT 8.0 software. Two parameters i.e. .Grit Size, Power each at two levels has been varied to investigate their effect on Surface Roughness. The Analysis of Variance (ANOVA) has been applied to identify significance of developed model. The test result confirms validity and adequacy of developed RSM model.
Keywords |
| Ultrasonic Machining (USM), Titanium, Grit Size, Power, Surface Roughness |
INTRODUCTION |
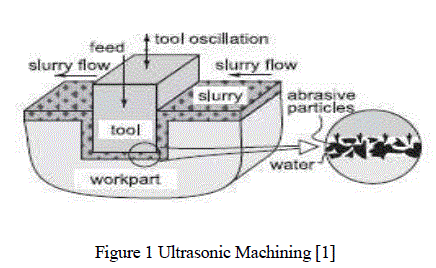
| Ultrasonic Machining is a nontraditional machining Process, in which abrasives contained in slurry are driven against the work by a tool oscillating at low amplitude (25-100 microns) and high frequency (15-30 kHz). Ultrasonic Machining is a mechanical type nontraditional machining process. It is employed to machine hard and |
| brittle materials (both electrically conductive & nonconductive) having hardness usually greater than 40 HRC .The process was first developed in 1950s and was originally used to finish EDM surfaces In ultrasonic machining, tool of desired shape vibrates at ultrasonic frequency ( 19 to 25 kHz. ) with an amplitude of 15-50 Microns over work piece Generally tool is pressed down with a feed force F. Between the tool and work, machining zone is flooded with hard abrasive particles generally in the form of water based slurry. As the tool vibrates over the work piece, abrasive particle act as indenter and indent both work and tool material. Abrasive particles, as they indent, the work material would remove the material from both tool and work piece In Ultrasonic Machining material removal is due to crack initiation, propagation and brittle fracture of material. |
| USM is used for machining hard and brittle material which are poor conductor of electricity and this cannot be processed by Electrochemical Machining or Electric Discharge Machining The tool in USM is made to vibrate with high frequency on to the work surface in the midst of the flowing slurry. The main reason for using ultrasonic frequency is to provide better performance. Audible frequencies of required intensities would be heard as extremely loud sound and would cause fatigue and even permanent damage to the auditory apparatus [1] |
 |
II. MATERIAL AND METHODS |
| Titanium and its alloys are used extensively in aerospace because of their excellent combination of high specific strength which is maintained at elevated temperature, their fracture resistant characteristics and their exceptional resistances to corrosion it also find application in compressor blades, rocket cases. Pressure vessels [2]. But machining of titanium and its alloys is generally cumbersome owing to several inherent properties of the material titanium is very chemically reactive and therefore has a tendency to weld to cutting tool during machining , thus leading to premature failure known as tool failure [3]. And its low thermal conductivity increases the temperature at tool work interface thus, affecting tool life adversely. Additionally, its high strength maintained at elevated temperature, further impairs the machinability, owing to all these problem it is very difficult to machine titanium and its alloys by conventional machining [4]. |
III. RESPONSE SURFACE METHODOLOGY |
The Response Surface Methodology (RSM) is a collection of mathematical and statistical technique that are useful for modeling and analysis of problems in which response of interest is influenced by several variable and objective is to optimize the response. In this paper a brief study of effects of USM parameter on above mentioned criteria (i.e. Surface Roughness), a second order polynomial response surface mathematical model can be developed. In general case, the response surface is described by an equation whose objective is to optimize the response. In this paper a brief study of effects of USM parameter on above mentioned criteria (i.e. Surface Roughness) a second order polynomial response surface mathematical model can be developed. In general case, the response surface is described by an equation which is,  |
| Where, y= Corresponding Response; Xi= input variables; Xi Xj= square and interaction term of this input variable B terms= unknown regression coefficients; E= Noise or error. |
III. EXPERIMENTAL WORK |
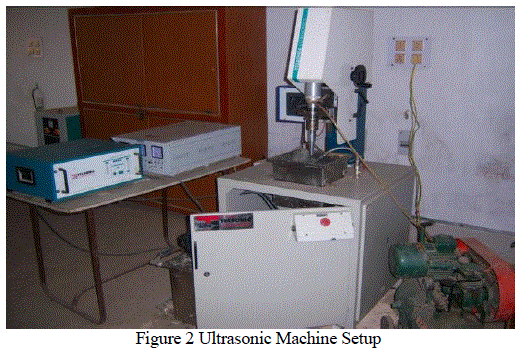
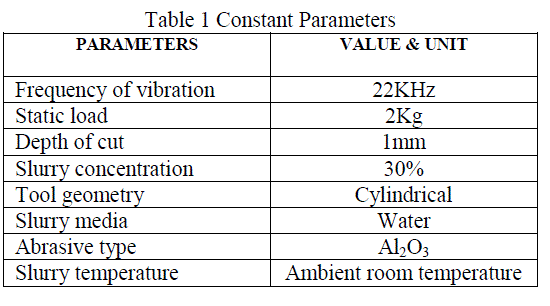
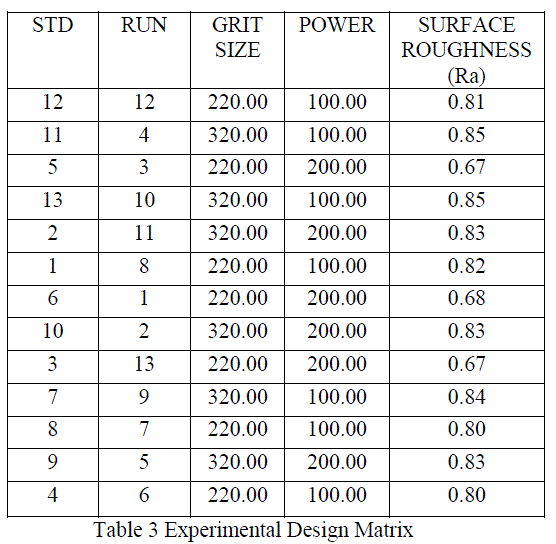
| The experiments were performed using titanium grade 2 as work material the different constant and variable parameters were listed on Table 1 and Table 2. The experiment plan is based on central composite design- RSM and it gives around twenty no’s of experiment using design expert software for empirical model development. At last ANOVA test was conducted to check adequacy and statistical significance of developed model. |
 |
 |
 |
 |
IV. RESULT & DISCUSSION |
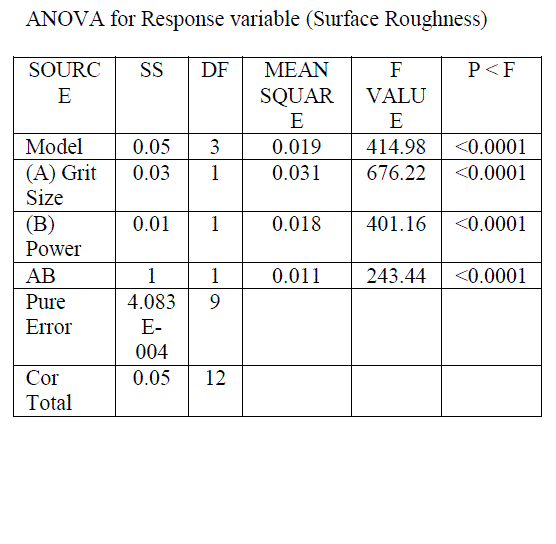 |
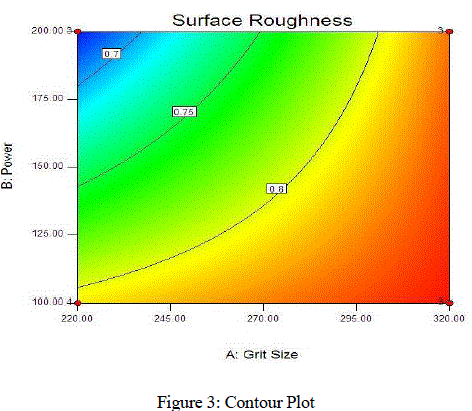
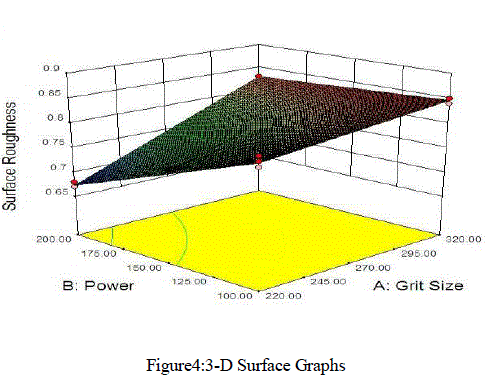
| P value < 0.0001 signifies statistical significance. Final equation of Surface Roughness; Ra= 0.79 * A0.049* A -0.038 * B+0.029*A*B The center line average of surface roughness for the holes were taken by Mitutoyo surface roughness tester (SJ-201), three reading were taken and their value were averaged. Power levels were found to be significant along with the grit size. |
 |
 |
IV. CONCLUSIONS |
| The experiments were carried out using High Carbon Steel as tool material, Different tool material and geometries needed to try out for analyzing its effect on output parameters. The work material titanium has a property of strain hardening while machining this factor has also to be incorporated and calls for further analysis along with taking other factors into consideration like slurry concentration, viscosity, effect of static load etc. |
References |
|