ISSN ONLINE(2319-8753)PRINT(2347-6710)
ISSN ONLINE(2319-8753)PRINT(2347-6710)
Manjunath M M1, Vijeth G K1, Rajiual Hoque1, Kannan P Mohanan1, Ashok Kumar A2, Shankar Gouda3
|
| Related article at Pubmed, Scholar Google |
Visit for more related articles at International Journal of Innovative Research in Science, Engineering and Technology
Aircraft designer needs to ensure the structural integrity of the airframe without compromising on the safety of the structure. This requires several stress analysis of different components, which represents the features of the airframe. Also these analysis predictions have to be substantiated by structural testing during the developmental phase. In current study a representative stiffened panel from a centre fuselage segment of an aircraft will be considered for the evaluation. The stress analysis of the stiffened panel will be carried out by using FEM approach. Aluminium alloy 2024-T351 material is used for the stiffened panel. Fuselage structure experiences the hoop tension and longitudinal tension because of the internal pressurization. If there is a crack in the unstiffened fuselage, under the flight condition it could lead to catastrophic failure of the structure. The fatigue crack will initiate normally from the highest tensile stress locations. Therefore rivet locations are the most probable locations for fatigue crack initiation. Miner’s rule will be employed for the fatigue damage calculation and life estimation of the structure. S-N curve of the aluminium alloy 2024-T351 will be used for obtaining the number of cycles to failure at particular stress magnitudes.
Keywords |
| Aircraft, Stiffened panel, internal pressurization, Finite element analysis, Fatigue crack, miners rule. |
INTRODUCTION |
| Aircraft is the science involved with the study, design, and manufacture of flight-capable machines, or the techniques of operating aircraft, one of the significant parts in aeronautics is a branch of physical science called aerodynamics, which deals with the motion of air and the way it interacts with objects in motion, such as an aircraft. Main components of an aircraft are, Fuselage, Wing Empennage or Tail, Power Plant, Landing gear or under carriage. Fuselage: The fuselage of an aircraft consists of sheet panels, stringers, and stiffeners held together by riveted lap joints. Although different joining techniques exist, the skin panels are typically fastened together with rivets. Numerous rivets are required to join the skin completely. In transport aircraft, the majority of the fuselage is cylindrical or nearcylindrical, with tapered nose and tail sections. |
II. DESIGN CONSIDERATION |
Introduction to Fatigue |
| Fatigue is the progressive and localized structural damage that occurs when a material is subjected to cyclic loading. The nominal maximum stress values are less than the ultimate tensile stress limit, and may be below the yield stress limit of the material. These words are important perspectives on the phenomenon of fatigue: |
| Process |
| Progressive |
| Localized |
| • Permanent structural change |
| • Fluctuating stresses and strains |
| • Point or points |
| • Cracks or complete fracture |
Characteristics of Fatigue |
| • In metals and alloys, the process starts with dislocation movements, eventually forming persistent slip bands that nucleate short cracks. |
| • Fatigue is a stochastic process, often showing considerable scatter even in controlled environments. |
The S-N Curves |
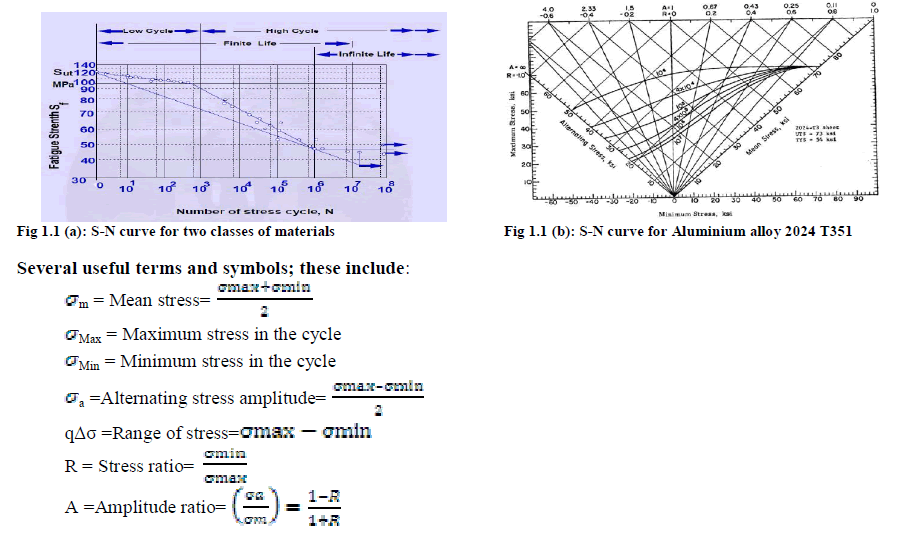
| Tests on several specimens are conducted under identical conditions with varying levels of stress amplitude. The cyclic stress level of the first set of tests is some large percentage of the Ultimate Tensile Stress (UTS), which produces failure in a relatively small number of cycles. Subsequent tests are run at lower cyclic stress values until a level is found at which the samples will survive 10 million cycles without failure. The results are plotted as an S-N diagram (see the below figure) usually on semilog or on log-log paper, depicting the life in number of cycles tested as a function of the stress amplitude. A typical plot is shown in the [Figure] below for two classes of materials. |
 |
III. MATERIAL SPECIFICATION |
| Material for centrefuselage: Aluminium 2024-T351 [1]. 1. Young’s Modulus, E = 73.1 Gpa 2. Poison's Ratio, μ = 0.33 3. Ultimate Strength, ÃÂñu = 470 Mpa 4. Yield strength, ÃÂñy = 280 Mpa 5. Fatigue strength, ÃÂñf= 138Mpa |
IV. FINITE ELEMENT ANALYSIS |
Stress analysis of fuselage segment Finite Element Model of the fuselage segment Skin |
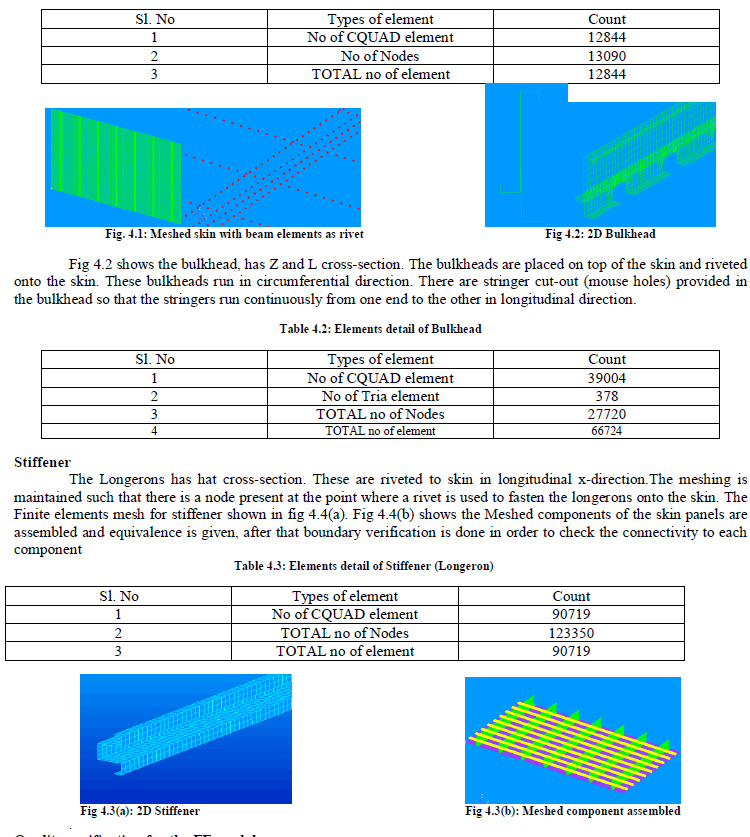
| Fig. 4.1 shows the mesh was carefully generated such that there is a node present at the point where riveting used to be simulated. The fig shows the rivets that are placed on the skin to hold the bulkheads, Longerons. |
 |
Quality verification for the FE model |
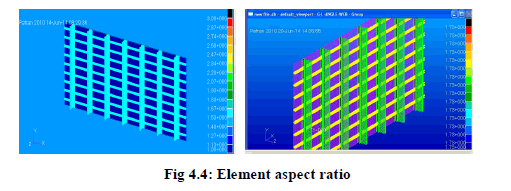
| The accuracy of the stress analysis result depends on the quality of the mesh generated and the quality of the elements used to represent the geometry of the components. Following are the element quality parameters obtained from the mesh generated for the segment of the fuselage being analyzed |
| CQUAD CTRIA |
| Aspect = max 3.0 Aspect = max 1.732 |
| Warp = max 0.0 Skew = min 44.999 |
| Skew angle = min 89.97 |
| Taper = max 0.000591 |
 |
Load cases and boundary conditions on fuselage segment |
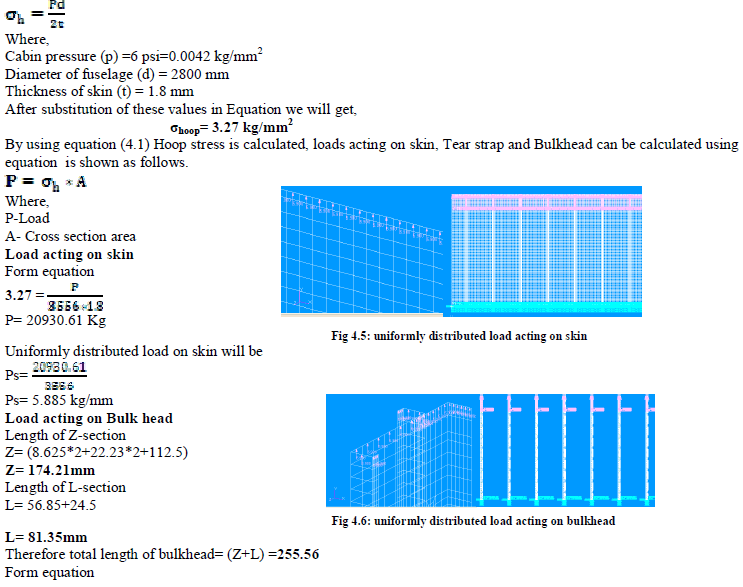
| A differential pressure of 6 psi (0.0007 kg/mm2) is considered for the current case. Due to this internal pressurization of fuselage (passenger cabin) the hoop stress will be developed in the fuselage structure. The tensile loads at the edge of the panel corresponding to pressurization will be considered for the linear static analysis of the segment. Hoop stress is given by, |
 |
 |
Displacement Contour of the fuselage segment |
| The Fig.4.7 shows the displacement contour of fuselage segment, Displacement can be obtained from fixing at one end and applying load at other end by constraining stringer ,skin, and bulkheads in z-direction, as shown by different colours fringes showing minimum magnitude of displacement while red colour showing maximum magnitude of displacement as 1.42 mm. |
 |
| Stress Contour of the fuselage segment Fig.4.8 shows the stress contour on the skin from fuselage segment analysis results. It is clear that the maximum stress on skin is at the rivet location where the rivets are used to fasten the bulkheads, longerons, tear strap and skin. The magnitude of maximum tensile stress is 3.4kg/mm2.The maximum tensile stress locations are at rivet in the skin. The fatigue cracks will initiate normally from the highest tensile stress locations therefore rivet locations are the most probable locations for fatigue crack initiation. The panel will be analysed with central crack bulkhead broken condition is discussed. |
V. RESULTS AND DISCUSSIONS |
Load calculation |
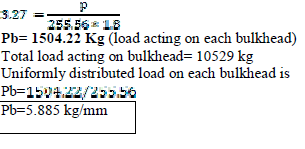
| A differential pressure of 6 psi (1psi=0.0007 kg/mm2) is considered for the current case. Due to internal pressurization of fuselage (passenger cabin) the hoop stress will be developed in the fuselage structure. The tensile loads at the edge of the panel corresponding to pressurization will be considered for the linear static analysis of the panel. Hoop stress is given by, |
 |
 |
| From results of fatigue analysis for different pressure cycles got the damage fraction is less than unity i.e. 1.5E- 03+1.10E-03+1E-03+8E-04+2E-06+1E-07+1E-05=0.000441. According to Palmgren-Miner linear damage rule when the damage fraction is less than unity the material is safe, often satisfactorily for failure is predicted. The damage at which failure is expected to occurs when the damage fraction is equal to |
VI. CONCLUSION |
| • In current study a representative fuselage segment from a transport airframe is considered for the evaluation. • Aluminum alloy 2024-T351 material is used for the fuselage segment. • Fuselage structure experiences the hoop tension and longitudinal tension because of the internal pressurization, |
References |
|