ISSN ONLINE(2319-8753)PRINT(2347-6710)
ISSN ONLINE(2319-8753)PRINT(2347-6710)
Sartaj Patel1, Mahesha.K2, Harish E.R.M3
|
| Related article at Pubmed, Scholar Google |
Visit for more related articles at International Journal of Innovative Research in Science, Engineering and Technology
Aircraft is symbol of a high performance mechanical structure with a very high structural safety record. In this an attempt had made to find the maximum tensile stress location in the bottom skin of transport aircraft by considering the behaviour of side spars for bending and ribs for transverse load. The component wing box with the access cut out in the bottom skin is considered for the analysis in this the behaviour of each rib and side spars is calculated or known. The maximum tensile stress location is identified. This location is the stress concentrated areas. In this location should be identified and the crack can be avoided.
INTRODUCTION |
| Airframe engineers view any cut outs in airframe structures with disfavour because the necessary reinforcement of the cut out increase costs and adds weight to the overall design. In addition, the design and sizing of cut outs is a difficult process since it is an area of stress concentration, a problem area for both static and fatigue strength and there is insufficient design data. Cut outs are essential in airframe structures to provide the following; Fuel access cutout at the bottom skin of wing and fuselage. Landing gear opening and retracting at the bottom skin of the wing or fuselage. Lightening holes in webs. Accessibility for final assembly and maintenance (e.g., manholes in wing lower surfaces, crawl holes in wing ribs, etc.). Inspection for maintenance (medium sized cutouts called hand holes). Window cutout in fuselage. In the current work, the component considered is the Fuel access cut out of wing bottom skin which provides the passage for fuel access in wing structure of the light weighted transport aircraft. During flight, the lower part of the wing experiences a tensile stress and the upper part experiences a compressive stress. The current case considers the bottom or lower part of the wing, which experiences tensile stresses. In order to withstand the bending of the wing section due to transverse loads acting on the wing, the wing box is provided with integrated stiffeners. Cut out which is intended to provide passage for fuel access comprises of auxiliary holes around the small cut out. Discontinuities or flaws in any structure leads to high stress concentration at that region. Here, cut-out with auxiliary holes will be the critical region. These are probable locations for fatigue crack initiation. So stress analysis of that wing box is necessary. |
II. GEOMETRICAL CONFIGURATION |
 |
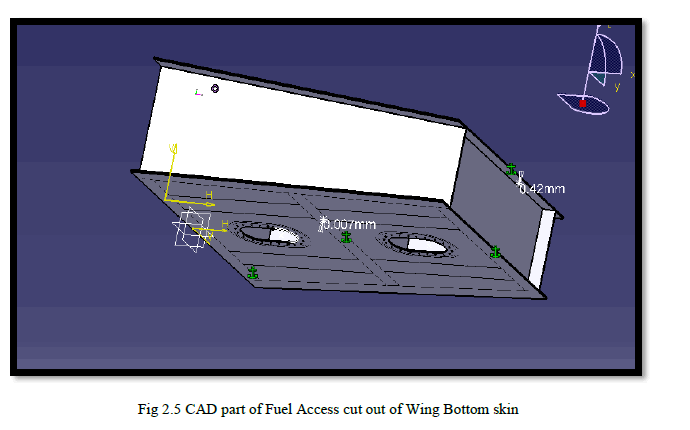 |
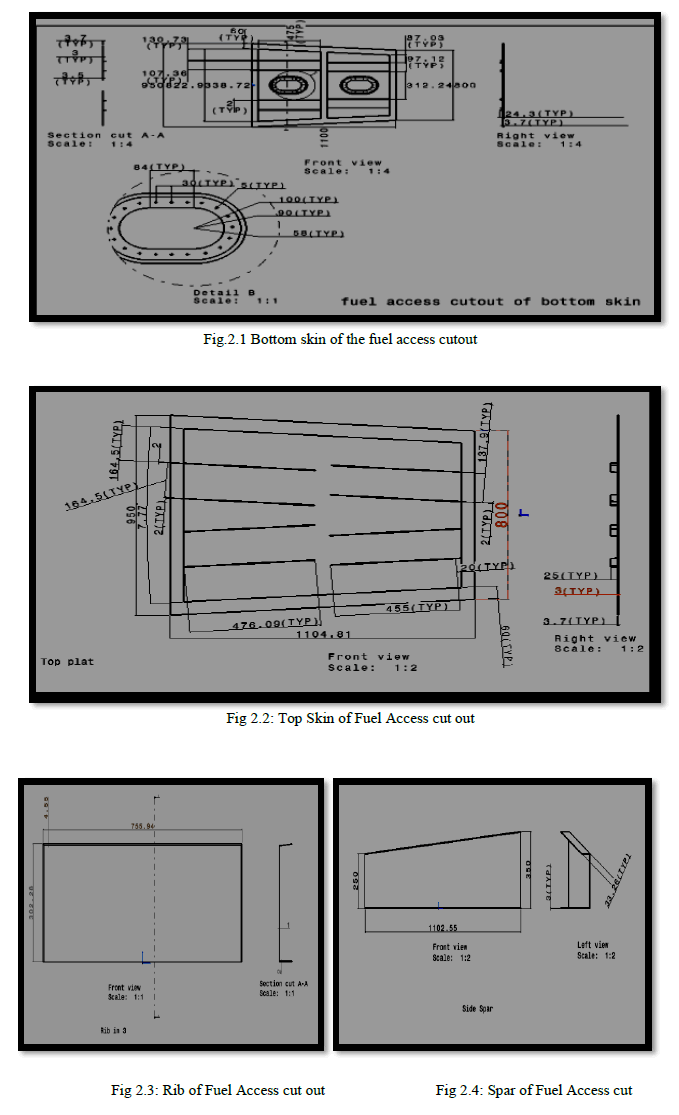
| Fuel access cut out of wing bottom skin consist in the bottom skin2.1 two capsule holes of large diameter for the access of the fuel from the tank. Small (auxiliary) holes around the cut outs of the tank are made for the revitation, revetes for the fixing of required accessories and also consists of the two sides spars for the bending load carrying as shown in the figure 2.4 and one top side plate2.2 for the bending, it has three ribs across the position in the fuel tank for the transverse load carry as show in figure 2.3. A CAD part of assembled section is shown below figure3.5. Bottom skin and top plates consists of stringers in longitudinal direction to increase the strength of plates, there are shown on the plates as above. |
III.MATERIAL SPECIFICATION |
| Selection of aircraft materials depends on any considerations, which can in general be categorized as cost and structural performance. Cost includes initial material cost, manufacturing cost and maintenance cost. The key material properties that are pertinent to maintenance cost and structural performance are: density, stiffness, strength, durability, damage tolerance, corrosion. The material considered for the lug part of the structure is Aluminium Alloy – 2024-T351, with the following properties. . 1. Young’s Modulus, E = 72400N/mm2 2. Poison's Ratio, μ = 0.3 3. Ultimate Strength, ÃÂñu = 503.7N/mm2 |
IV.LOADS ON THE FUEL ACCESS CUT OUT OF WING BOTTOM SKIN |
| Most of the wing bending is carried by the spars in the wing structure. The maximum bending moment occurs at the root of the spar where wing and fuselage components will be attached to each other. The load calculation for the Fuel access cutout of wing bottom skin is described in the next section. A: Load calculation for the fuel access cutout of wing bottom skin The load experienced by the wing box is obtained as follows: Weight of the Aircraft structure =15696N Load factor =3.0 g Factor of safety = 1.5 |
| Total load =15696*4.5 =70632N Lift load acting on the wing =80%of total load =70632*0.8=56505.6N Load acting on each wing =56505.6/2=28252.8N Span of the wing = 3000 mm Location of resultant load from the root of the wing = 1250 mm Bending moment at the root = 2880*1250 = 3.53x10⁷N-mm Load to be applied at the end of the wing box considered for the analysis = 3.53x10⁷/168 = 20959.05N Total Edge length of the component where load is applied = 1851.4 mm Total UDL load applied for the component = 20959.05/1851.4 = 11.31 N/mm |
V.FINITE ELEMENT ANALYSIS |
| A: Introduction to FEA approach The finite element method (FEM) is a numerical technique for solving problems which are described by partial differential equations or can be formulated as functional minimization. A domain of interest is represented as an assembly of finite elements. Approximating functions in finite elements are determined in terms of nodal values of a physical field which is sought. A continuous physical problem is transformed into a discretized finite element problem with unknown nodal values. For a linear problem, a system of linear algebraic equations should be solved. Values inside finite elements can be recovered using nodal values. B: The different stages of finite element analysis The software used for the analysis of the Landing gear lug attachment joint in an airframe is MSC.Patran & MSC.Nastran. The stages involved in FEM are shown in the figure below |
 |
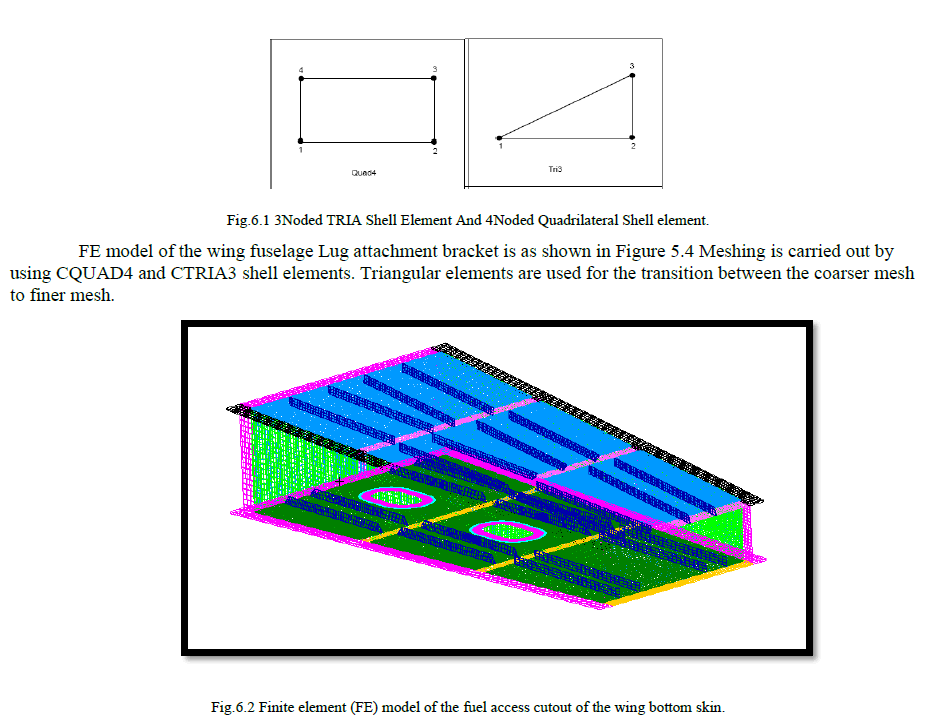
| As per the design calculations from the previous section the dimensions of the fuel access cutout of the wing bottom skin. All other dimensions of the complete assembly of the structure are as per the description provided in the previous section in the problem definition chapter. A finite element model is the complete idealization of the entire structural problem including the node location, the element, physical and material properties, loads and boundary conditions. The purpose the finite element model is to make a model that behaves mathematically as being modelled and creates appropriate input files for the different finite element solvers. In Finite Elements libraries, selected 4 Nodded QUADRILATERAL Shell Element (QUAD4). In this Geometrical model for available surface area, chosen for formulation of FE Model, reason was flow of displacement and stiffness. |
 |
VII.LOADS AND BOUNDARY CONDITIONS |
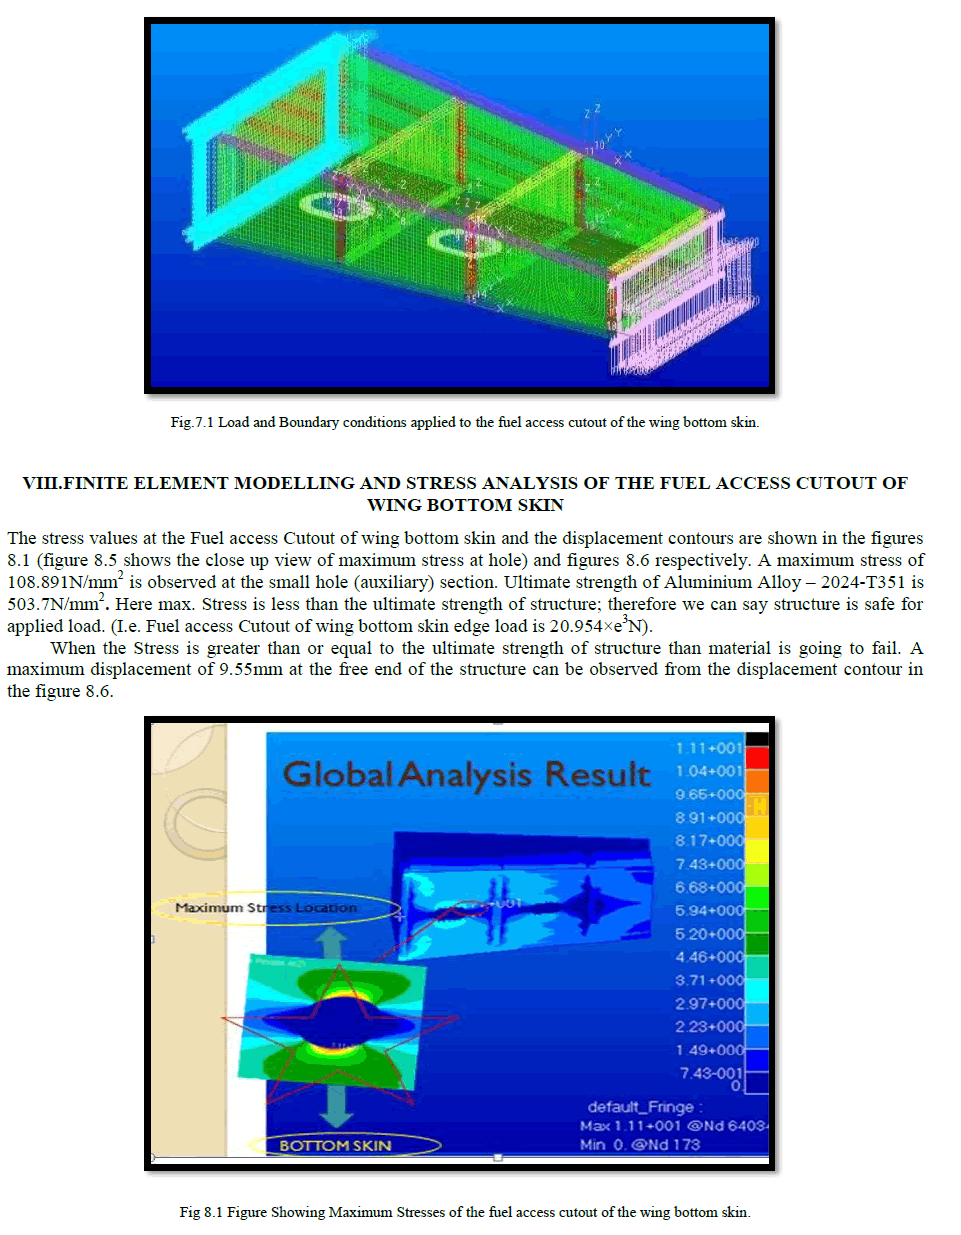
| The loads and boundary conditions along with the finite element model are shown in the figure 7.1. A load 11.31 N/mm of is introduced at one end of the spar beam. This load will essentially create the required bending moment at the root. The top and bottom auxiliary holes of the Fuel access cutout of wing bottom skin are constrained with all six degrees of freedom at the semicircular circumferential region. |
 |
 |
 |
9. RESULTS AND DISCUSSIONS |
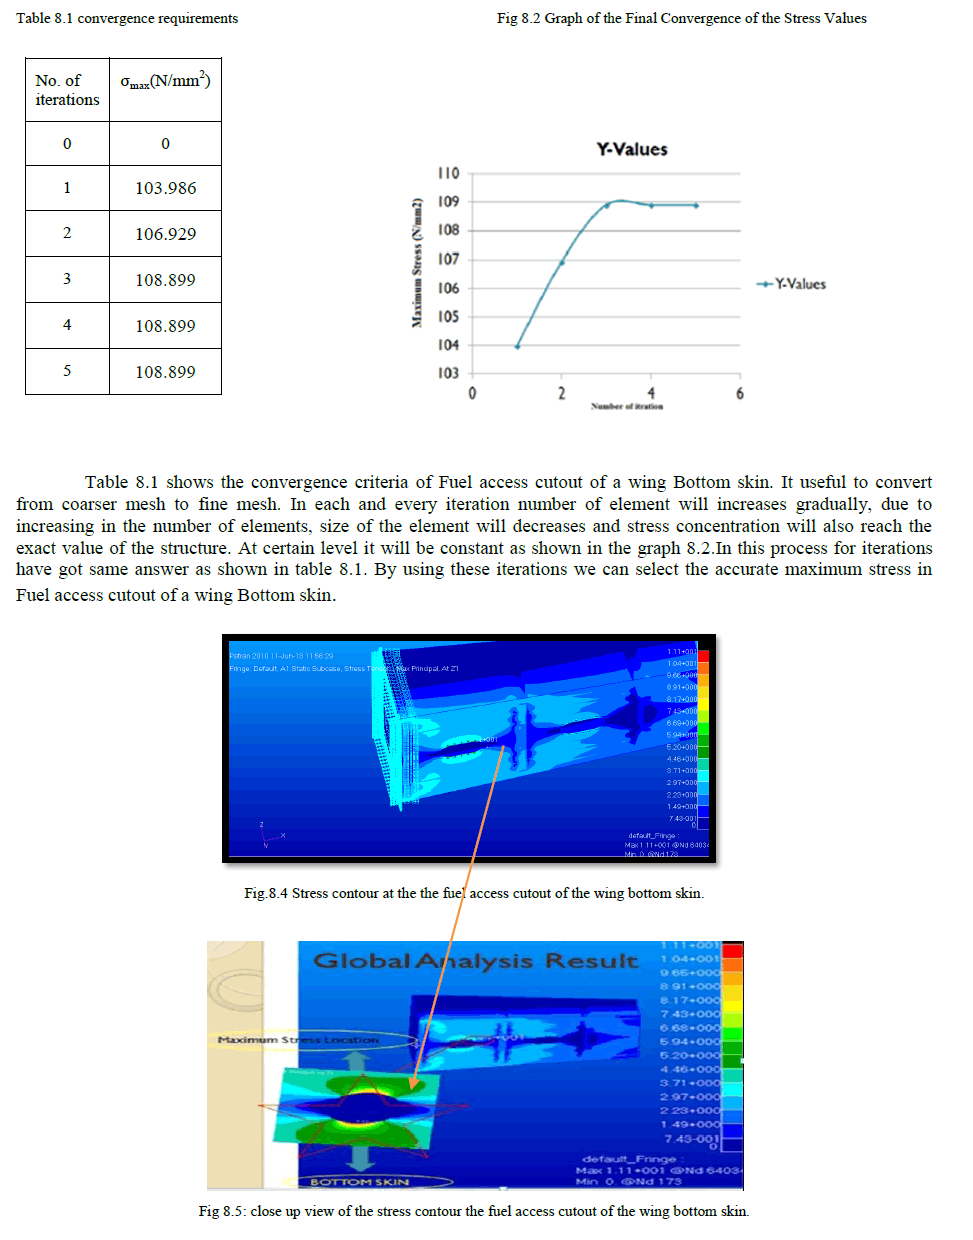
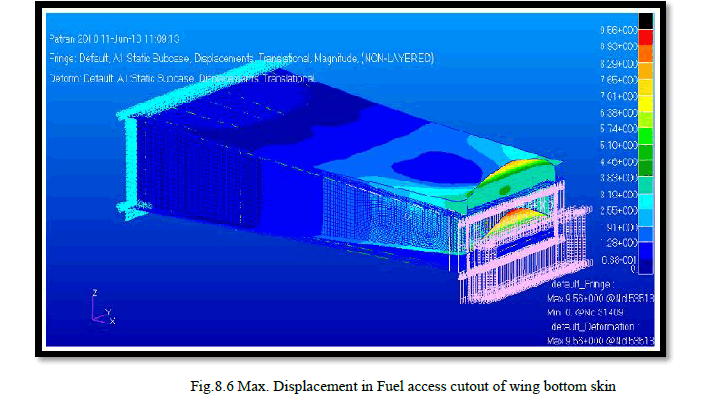
| The stress contour indicates a maximum stress of 108.891N/mm2 at fuel access cutout of wing bottom skin as shown in the figure 8.1. The maximum stress value obtained is within the yield strength of the material. The point of maximum stress is the possible location of crack initiation in the structure due to fatigue loading. |
10. CONCLUSIONS |
| Stress analysis of the fuel access cutout of wing bottom skin is carried out and maximum tensile stress. FEM approach is followed for the stress analysis of the fuel access cutout of wing bottom skin .A validation for FEM approach is carried out by considering a plate with a circular hole. Maximum tensile stress of 108.891N/mm2 is observed in the fuel access cutout of wing bottom skin. Several iterations are carried out to obtain a mesh independent value for the maximum stress. A fatigue crack normally initiates from the location maximum tensile stress in the structure. |
ACKNOWLEDGEMENT |
| The analytical work was conducted Bangalore Aircraft Industries Private Limited, the author gratefully acknowledge their support The author also would like to thank K E Girlish(DIRECTOR, BAIL) for providing expert guidance and advice for the analytical work. Addition the author would like to thank theto Dr. Mahesha.K. Professor and Head of the Department, Mechanical Engineering, Acharya Institute of Technology, Bangalore. |
References |
|